Table of Contents
Produmex Scan Customization Guide
Customization Technology
The customization process for the Produmex mobile applications consists of the following steps:
- Enable the Customization Assist mode and run the client application. Check the customization information of the screen.
- Create the custom field and/or the SAP user query.
- Restart the client application and check the results of the customization.
Many screens of Produmex mobile applications are customizable with SAP Business One’s queries. The used query have to be named specifically based on the screen it is used on. The query names, and parameters can be found with the help of the 'Customization Assist'. The query result column names indicate which fields to set.
Supported customization types:
- Preset field data
- Validation: The system checks if the entered values are correct during a ‘validate’ or a ‘button’ event.
- Add new fields/Hide existing fields
Helpful Tips and Resources
Click the link below to visit our Article site, where you will find examples and useful information. We are continuously adding new articles featuring the most common customizations.
Produmex Scan Articles: Customization (more subsections are available)
Functional changes introduced in new software releases can impact the behavior of customizations. Customizations are not part of the standard software, and are therefore not tested against new software releases. If you have any customizations, please make sure that appropriate testing protocols are applied to validate the customizations against the new software release.
Enable the Customization Assist
To see information regarding the customization possibilities enable the Customization Assist mode.
Note: The Customization Assist mode is only needed to see customization possibilities. It is not required to be enabled during normal operations.
1. Start the Produmex Scan Configuration application.
2. Enable the Customization Assist Mode setting on the Advanced tab, then press OK to save the setting.

3. Run Produmex Scan and go to the screen that needs to be customized.
4. Tap the C button on the top of the screen.
The Customization screen opens up and it lists the possible parameters for customization with their current value and the customizable events.

Create custom fields
Open the Customization Fields table in SAP Business One via Tools > User-Defined Windows > Customization Fields (BXCUSTFD).

Field Name
The field name will be used to identify the field on the Customization window and in user queries. It is possible to create a new field or to add an existing Produmex Scan field. If the name of an existing field is added, the other properties can be changed.
Example:
In the example we add a custom delivery date field to the Goods Receipt PO screen and we hide the UoM field.
| Field Name | Field Type | Label | Module | Screen | Visible | Ready Only |
|---|---|---|---|---|---|---|
| DELDATE | String | Del.Date | BXMobileWH9 | GoodsReceiptPOLinesScreen | Yes | Yes |
| TextUoM | String | BXMobileWH9 | GoodsReceiptPOLinesScreen | No |
To add data to the fields defined in the Customization Fields user table, use user queries.

It is also possible to add fields that already exist in SAP Business One as a user defined field. In this case no user query is required to copy the values added on the scanner to the database, but additional user queries are needed to populate the fields on the device with the database values.
Add SBO Header Field
Note: This function does not exist on line level.
In order to add an SBO header field, add the DI API field name and the BO_ prefix as the field name on the Customization Fields user table.
Hereinafter you can also change the other properties. When providing the value for Screen, make sure that you indicate the screen from where the final posting process will begin.
Example:
Add the Description field from the SBO Bin Location Master Data form to the Bin Attributes Produmex Scan screen.
| Field Name | Field Type | Label | Module | Screen | Read Only |
|---|---|---|---|---|---|
| BO_Description | String | Description | BXMobileWH9 | BinAttributesScreen | No |
Exception: Field Ref2 must be referenced as BO_Reference2 in the Field Name column.
Add SBO User Defined Field for document header
Note: This function does not exist on line level.
In order to add an SBO user defined field, add the field title with the BO_U_ prefix as the field name on the Customization Fields user table.
Hereinafter you can also change the other properties. When providing the value for Screen, make sure that you indicate the screen from where the final posting process will begin.
Example:
Add the ‘Customer’ user defined field from the SBO Bin Location Master Data form to the Bin Attributes Produmex Scan screen.

| Field Name | Field Type | Label | Module | Screen | Read Only |
|---|---|---|---|---|---|
| BO_U_PMXCUS | String | Customer | BXMobileWH9 | BinAttributesScreen | No |

Add Batch/Serial Number Details
Batch and Serial Number Details has to be added with the following format: #FieldName.
| Title on Batch Details | DB field name | Field Name (CustomizationFields user table) |
|---|---|---|
| Expiration Date | ExpDate | #ExpirationDate |
| Manufacturing Date | MnfDate | #ManufacturingDate |
| Batch Attribute 1 | MnfSerial | #Attribute1 |
| Batch Attribute 2 | LotNumber | #Attribute2 |
| Details | Notes | #Details |
| Title on Serial Number Details | DB field name | Field Name (CustomizationFields user table) |
|---|---|---|
| Expiration Date | ExpDate | #SerialExpirationDate |
| Manufacturing Date | MnfDate | #SerialManufacturingDate |
| Mfr Serial No. | MnfSerial | #SerialAttribute1 |
| Lot Number | LotNumber | #SerialAttribute2 |
| Details | Notes | #SerialDetails |
The default Serial number input field should be the last input field during the data entering process. It is because the Serial number will be added to the list in its validation event.
NOTE: Batch and serial number details are not supported on material return documents and A/R Credit Memos.
Field Type
Type of the field.Supported field types:
- Button(13): Creates a new button. It will have a ‘click’ and ‘click after’ event.
- String(0): Creates a new input field for alphanumeric values. It will have a ‘validate’ and ‘validate after’ event.
- Quantity(5): Creates a new input field. The user can add a number with decimals as the value. It will have a ‘validate’ and ‘validate after’ event.
- Percent(6): Creates a new input field. The user can add a percentage as the value. It will have a ‘validate’ and ‘validate after’ event.
- Integer(8): Creates a new input field. The user can add a whole number as the value. It will have a ‘validate’ and ‘validate after’ event.
- Valid Value Selection(9): Creates a new input field or predefine an already existing input field. The user can add a Valid Value Selection type customization to an input field - ChooseFromList type customization is set for an input field. It will have a ‘validate’ and ‘validate after’ event.
Label
The displayed text. It is also possible the change the label of an existing field.
Module
The name of the mobile solution. Add BXMobileWH9.
On External Form
Defines whether the new field is added to an external screen or not. If you select Yes in the column, a new button (E) is displayed to open the external screen.

Position Data
The position of an object can be changed in this field. Possible values:
- x: - horizontal position (% of screen width from left)
- y: - vertical position (% of screen height from top)
- w: - width (% of screen width)
- h: - height (% of screen height)
- f: - font size (pixel) only on ‘Button’ and for DataRepeater
- lines: - the number of extra lines to be added to the screen, only for DataRepeater
(see section 7. Manipulating DataRepeater / 7.3. Adding extra lines to screens)
Please note that only integer values are allowed. Separate the different parameters with the ‘;’ character.
E.g.: x:1;y:50;w:50;h:80;lines:3
Font size example:

Protected
If it is set to yes, the field is displayed on the next screen as well and the entered value is in read-only mode on this second screen.
Note:
- If a field is customized on a given screen, it cannot be added to the same screen again as a protected field.
- It is recommended to convert the value of the protected field on the second screen in your query because if the field does not contain any value, it can cause any error.
Read Only
Defines whether the field will be read only or not.
Screen
The screen name. The screen name can be found in the first line on the Customization window.
Visible
Defines whether the field is displayed on the screen or not.
Create an SAP user query
Open the Query Manager in SAP Business One via: Tools > Queries > Query Manager
Create the user query.
The name of the query defines when it will be executed, therefore save it as the name of the event when you would like to run the user query.
EXAMPLE: The user query that runs when the ‘GR PO’ screen is loaded in Produmex Scan is 'BXMobileWH9_GoodsReceiptPOScreen_Load'
Supported message types
The following message types can be used in user queries for Produmex Scan:
- I: Information
A pop up information message will be prompted, that needs user confirmation (OK). The event will execute. - E: Error
A pop up error message will be prompted, that needs user confirmation (OK). The event will not execute. - YM: Yes/No with message box
A pop up confirmation message will be prompted, that can be answered with yes or no. The event will execute depending on user choice.
Restart the application
To apply the customization restart the mobile application.
You must restart the application every time a new user query is created but it is not necessary to restart the application when modifying an existing query.
Customization Examples
Goods Receipt PO
Helpful Tips and Resources
Click the link below to visit our Article site, where you will find examples and useful information. We are continuously adding new articles featuring the most common customizations.
Produmex Scan Articles: Customization
Set (user) fields in GR PO
The customization makes possible to set additional fields (SAP or user fields) in the Goods Receipt PO document from.
Go to GR PO Lines screen, and open Customization window. Here you can see the name of this screen: GoodsReceiptPOLinesScreen

To add new fields, open the CustomizationFields User-Defined window in SAP Business One. Use the recommended parameters as below:
| Screen | Module | Label | Field Name | Read Only |
|---|---|---|---|---|
| GoodsReceiptPOLinesScreen | BXMobileWH9 | Del.Date | DELDATE | YES |
Now you are able to load data into this new field. To do it, you have to use the BXMobileWH9_GoodsReceiptPOLinesScreen_Load user query.

If you want to select the delivery date of the purchase order, you will need the purchase order number. You can check the field name on customization screen.
In the example: $[TextPurchaseOrder] = 10 * Mega Supplier LLC
You have to use $[TextPurchaseOrder] field and you have to split the string in the query. If you want to read the data from the field, then you have to use $ character.
SELECT  DocDueDate as [DELDATE] FROM OPOR
WHERE DocNum = SUBSTRING( $[TextPurchaseOrder], 0, CHARINDEX('*', $[TextPurchaseOrder], 1) - 1)

Set Freight
It is possible to set the Freight costs/lines in the created Goods Receipt PO with user query. Please see 2.1 Set Freight in Delivery document for the example query.
| UserQuery: bx_mobile_wh9_document_additionalexpenses (Category: BXMobileWH9) | |
|---|---|
| Parameters [%1] - employeeID [%2] - TerminalID [%3] - Head Code from Mobile Transaction table (@BXPLMSMOBTHD.Code) [%4] - grouped Head Codes (string, list), separated with # characters, only applicable for grouped Purchase Order/APReserve invoice → Goods Receipt PO | Results Zero, one or more rows for the Freight charges to be created. The result columns can have the names: * BO_LineTotal = the LineTotal field, amount of money (mandatory) * BO_ExpenseCode = Expense Code (integer) (mandatory) |
Batch number generation
On some screens (e.g. Goods Receipt PO, Receipt from Production) the system can automatically generate batch numbers when entering the received quantities and bin locations. The batch number generation logic can be defined in a user query.
| UserQuery: bx_mobile_wh9_get_new_batchnumber (Category: BXMobileWH9) | |
|---|---|
| Parameters [%1]: employee ID (int) [%2]: terminal ID (nvarchar) [%3]: base document type (int) [%4]: base document entry (int) [%5]: base document line (int) [%6]: item code (nvarchar) | Results The user query should return the batch number in a column called BXBATNUM (type of the field should be NVARCHAR) |
Note: The standard click and click_after events cannot use the parameters of the bx_mobile_wh9_get_new_batchnumber query.
Example:
The following query generates a batch number combining the supplier code and the current date:
SELECT T0.[CardCode] + '-' + CONVERT(varchar, GETDATE(), 112) AS 'BXBATNUM'
FROM OPOR T0 WHERE T0.[DocEntry] = [%4]
Serial number generation
In the Goods Receipt PO process, the system can automatically generate serial numbers when entering the received stocks. The serial number generation logic needs to be defined in a user query.
| UserQuery: bx_mobile_wh9_get_new_serialnumber (Category: BXMobileWH9) | |
|---|---|
| Parameters [%1]: employee ID (int) [%2]: terminal ID (nvarchar) [%3]: base document type (int) [%4]: base document entry (int) [%5]: base document line (int) [%6]: item code (nvarchar) | Results The user query should return as single serial number in a column called BXSERNUM. Note: If the query returns more than one row, the first row's value will be used. |
Expiration date at GRPO/Inventory
The following fields can be used at BatchScreen or SerialScreen:
BATCH_EXPIRATION_DATE = “#ExpirationDate”;
BATCH_MANUFACTURING_DATE = “#ManufacturingDate”;
BATCH_ATTRIBUTE1 = “#Attribute1”;
BATCH_ATTRIBUTE2 = “#Attribute2”;
BATCH_DETAILS = “#Details”;
SERIAL_EXPIRATION_DATE = “#SerialExpirationDate”;
SERIAL_MANUFACTURING_DATE = “#SerialManufacturingDate”;
SERIAL_ATTRIBUTE1 = “#SerialAttribute1”;
SERIAL_ATTRIBUTE2 = “#SerialAttribute2”;
SERIAL_DETAILS = “#SerialDetails”;
These fields can be added on the CustomizationFields table.
Example for batches:
| Field Name | Label | Screen |
|---|---|---|
| #ExpirationDate | BBD | ReceiptFromProductionQuantitiesBatchScreen |
| #ManufacturingDate | ManufacturingDate | ReceiptFromProductionQuantitiesBatchScreen |
| #ExpirationDate | BBD | GoodsReceiptPOQuantitiesBatchScreen |
2.1.6. Generate GRPO from Draft
Note: This customization is compatible from SAP Business One version 2405 or later versions. It will not function on earlier versions!
With this customization GRPOs can be created from draft. When starting the Goods Receipt Purchase Order function on the scanner and there is a draft GRPO registered in SBO for the given warehouse, the draft document is listed among the Purchase Orders.
The 'Post' button is immediately active for draft documents when selected and the 'Receive' button is hidden/not available. When the 'Post' button is pressed while a GRPO draft is selected, the GRPO is created from the GRPO draft with the exact same stock parameters as the GRPO draft.

Note: DR = draft GRPO (new), PO = Purchase Order, RI = A/P Reserve Invoice
UserQuery: bx_mobile_wh9_goodsreceiptpo_query_custom
SELECT
	Distinct "DocEntry", "DocType", ItemCode
FROM (
	SELECT "OPOR"."DocEntry", 22 as "DocType", "CardCode", "DocNum", "DocDueDate", "POR1"."ItemCode" FROM "POR1" LEFT JOIN "OPOR" ON "POR1"."DocEntry" = "OPOR"."DocEntry" WHERE "DocStatus" = 'O'
	UNION
	SELECT "OPCH"."DocEntry", 18 as "DocType", "CardCode", "DocNum", "DocDueDate", "PCH1"."ItemCode" FROM "PCH1" LEFT JOIN "OPCH" ON "PCH1"."DocEntry" = "OPCH"."DocEntry" WHERE "DocStatus" = 'O'
	UNION
	SELECT "ODRF"."DocEntry", 20 as "DocType", "CardCode", "DocNum", "DocDueDate", "DRF1"."ItemCode" FROM "DRF1" LEFT JOIN "ODRF" ON "DRF1"."DocEntry" = "ODRF"."DocEntry" WHERE "ODRF"."ObjType" = '20' AND "DocStatus" = 'O' AND "ODRF"."WddStatus" in ('Y','')
	) as DOCUMEND
WHERE
	(CASE WHEN isnull($[ItemCode], '') = '' THEN 1 ELSE CASE WHEN "DOCUMEND"."ItemCode" = $[ItemCode] THEN 1 ELSE 0 END END) = 1
	AND (CASE WHEN isnull($[DocNum], '') = '' THEN 1 ELSE CASE WHEN "DOCUMEND"."DocNum" = $[DocNum] THEN 1 ELSE 0 END END) = 1
	AND (CASE WHEN isnull($[CardCode], '') = '' THEN 1 ELSE CASE WHEN "DOCUMEND"."CardCode" = $[CardCode] THEN 1 ELSE 0 END END) = 1
	AND (CASE WHEN isnull($[DueDate], '') = '' THEN 1 ELSE CASE WHEN "DOCUMEND"."DocDueDate" = $[DueDate] THEN 1 ELSE 0 END END) = 1
Implementation:
Add the query in the Query Manager in SBO

Sales Orders
Set Freight in Delivery document
By default the Freight in the created Delivery document is 0. It is possible to customize Produmex Scan so freight lines are added with a custom freight calculation algorithm. This algorithm receives a parameter which allows to query the items, quantities, base documents which will be used to create the new Delivery Document.
| UserQuery: bx_mobile_wh9_document_additionalexpenses (Category: BXMobileWH9) | |
|---|---|
| Parameters [%1] - employeeID [%3] - Head Code from Mobile Transaction table (@BXPLMSMOBTHD.Code) [%4] - grouped Head Codes (string, list), separated with # characters, only applicable for grouped Purchase Order/APReserve invoice → Goods Receipt PO | Results Zero, one or more rows for the Freight charges to be created. The result columns can have the names: BO_LineTotal = the LineTotal field, amount of money (mandatory) BO_ExpenseCode = Expense Code (integer) (mandatory) |
Example:
A combined query to copy expenses from Sales Orders and Purchase Orders.
Query name: bx_mobile_wh9_document_additionalexpenses
declare @salesOrderDocEntry int
SELECT @salesOrderDocEntry = U_BXPBsDcE
FROM [@BXPLMSMOBTLN]
WHERE U_BXPHdCd = [%3] AND U_BXPBsDcT = 17 AND U_BXPDocTy = 15
-- 15-delivery, 17-sales order
IF @salesOrderDocEntry > 0
BEGIN
SELECT
	ExpnsCode as BO_ExpenseCode,
	LineTotal as BO_LineTotal,
	17 as BO_BaseDocType,
	@salesOrderDocEntry as BO_BaseDocEntry,
	LineNum as BO_BaseDocLine
FROM RDR3
WHERE DocEntry = @salesOrderDocEntry AND Status <> 'C'
END
declare @purchaseOrderDocEntry int
SELECT @purchaseOrderDocEntry = U_BXPBsDcE
FROM [@BXPLMSMOBTLN]
WHERE U_BXPHdCd = [%3] AND U_BXPBsDcT = 22 AND U_BXPDocTy = 20
-- 22-Purchase order, 20-Goods Receipt PO
IF @purchaseOrderDocEntry > 0
BEGIN
SELECT
	ExpnsCode as BO_ExpenseCode,
	LineTotal as BO_LineTotal,
	22 as BO_BaseDocType,
	@purchaseOrderDocEntry as BO_BaseDocEntry,
	LineNum as BO_BaseDocLine
FROM POR3
WHERE DocEntry = @purchaseOrderDocEntry AND Status <> 'C'
END
HANA version
CREATE PROCEDURE PMXSCAN_ADDITIONALEXPENSES (
	IN
    pHeadCode NVARCHAR(5000)
)
LANGUAGE SQLSCRIPT
AS
BEGIN
	declare purchaseOrderDocEntry int;
	declare salesOrderDocEntry int;

	SELECT SUM("U_BXPBsDcE") into salesOrderDocEntry FROM
	(
		SELECT 0 "U_BXPBsDcE" FROM DUMMY
		UNION
		SELECT "U_BXPBsDcE"
		FROM "@BXPLMSMOBTLN"
		WHERE "U_BXPHdCd" = pHeadCode AND "U_BXPBsDcT" = 17 AND "U_BXPDocTy" = 15
	);

	-- 15-delivery, 17-sales order
	IF salesOrderDocEntry > 0 THEN
		SELECT
			"ExpnsCode" as "BO_ExpenseCode",
			"LineTotal" as "BO_LineTotal",
			17 as "BO_BaseDocType",
			salesOrderDocEntry as "BO_BaseDocEntry",
			"LineNum" as "BO_BaseDocLine"
		FROM "RDR3"
		WHERE "DocEntry" = salesOrderDocEntry AND "Status" <> 'C';
	END IF;

	SELECT SUM("U_BXPBsDcE") into purchaseOrderDocEntry FROM
	(
		SELECT 0 "U_BXPBsDcE" FROM DUMMY
		UNION
		SELECT "U_BXPBsDcE"
		FROM "@BXPLMSMOBTLN"
		WHERE "U_BXPHdCd" = pHeadCode AND "U_BXPBsDcT" = 22 AND "U_BXPDocTy" = 20
	);

	-- 22-Purchase order, 20-Goods Receipt PO
	IF purchaseOrderDocEntry > 0 THEN
		SELECT
			"ExpnsCode" as "BO_ExpenseCode",
			"LineTotal" as "BO_LineTotal",
			22 as "BO_BaseDocType",
			purchaseOrderDocEntry as "BO_BaseDocEntry",
			"LineNum" as "BO_BaseDocLine"
		FROM "POR3"
		WHERE "DocEntry" = purchaseOrderDocEntry AND "Status" <> 'C';
	END IF;

END;


SAP Query name:
bx_mobile_wh9_document_additionalexpenses

content:
call "PMXSCAN_ADDITIONALEXPENSES"( [%3] );
This example user query looks at the Mobile Transaction (lines) table, filters for Base Document Type = Sales Order, finds the base Sales Order Document DocEntry. It then retrieves the freight expense records related to the Sales Order (from table RDR3), and extracts Expense Code and Line Total, so it essentially copies all the freight charges from the Sales Order without any calculation.
Packing ID
It is possible to record packaging ID during picking. The package ID screen can be added to the picking lines screen.
Example:
| Field Name | Label | Screen |
|---|---|---|
| #PackageId | Package ID | PickingLinesPickNormalScreen |
| #PackageId | Package ID | PickingLinesPickBatchScreen |
| #PackageId | Package ID | PickingLinesPickSerialScreen |

The Package ID is automatically filled with the last Package ID value that was added for the pick list. Both numbers and letters are supported in this field.
The package ID is stored on the MobilePickingData (BXPLMSMOBPICK) user table.

Pick Lists
Set Freight in Delivery
Please see: 2.1 Set Freight in Delivery document
Set (user) fields in Delivery
It is possible to set the values of the Delivery Document which are created from the Produmex Scan Pick List screen.
To set a field, you have to add a customization field to the Pick List Lines screen. The customization field name must be:
- BO_U_XXField1 to set Delivery Document U_XXField1 custom field
- BO_FieldName to set Delivery Document SAP internal field by API name. In this case, the field name must match the DI API name. Example: BO_JournalMemo
In the Customization Fields user table, it is important that the Field Name is BO_U_*and it must match the UDF name (with a U_Prefix), eg. BO_U_Test1 → Test1 userdefined field. The Label can be anything.
Example:
| Screen | Module | Label | Field Name |
|---|---|---|---|
| PickingLinesScreen | BXMobileWH9 | Test 1 | BO_U_Test1 |
| PickingLinesScreen | BXMobileWH9 | Test 2 | BO_U_Test2 |

When pressing the Delivery button on the Pick List lines screen, these field values will be used in the newly created Delivery Document.
Pick List screen - customize list
With the default settings, only open pick lists that have not been started by anyone are displayed, but the original program logic can be overridden by customization.
| UserQuery: bx_mobile_wh9_picklists_query_custom (Category: BXMobileWH9) | |
|---|---|
| Parameters $[AbsEntry] $[CardCode] $[EmployeeNo] - logged in employeeID $[ItemCode] $[PickDate] $[WarehouseCode] | Results A table with multiple rows with a single column (integer) with PickList AbsEntry values. (OPKL.AbsEntry) |
Example:
With the example user query the list of picklists is filtered down to picklist assigned to the employee. We used the ‘Picker’ field on the Pick list to assign the employee to the pick list.
Please note: The Picker field must be in the 'FirstName LastName' or 'FirstName MiddleName LastName' format for the example user query to work.

The example user query name: bx_mobile_wh9_picklists_query_custom
IF $[AbsEntry] IS NOT NULL
BEGIN
	SELECT AbsEntry
	FROM OPKL WHERE AbsEntry = $[AbsEntry] AND Status <> 'C'
END
ELSE
BEGIN
	SELECT AbsEntry
	FROM OPKL
	WHERE  Name = (SELECT firstName + ' ' + ISNULL(middleName + ' ', '') + lastName
	FROM OHEM
	WHERE empID = $[EmployeeNo]) AND Status <> 'C'
	ORDER BY AbsEntry
END
This simple example only filters for employee or PickListNo, but doesn't respect other filters like Customer, Item, DueDate, Warehouse. It also allows the employee to enter a PickListNo and allows him to select that pick list even if he's not assigned for it.
Auto fill batch with recommended batch
To automatically populate the Batch field with the recommended batch, add the following query:
Query name: BXMobileWH9_PickingLinesPickBatchScreen_Activate
SELECT $[TextRecBatch] AS [TextBatch]
Capture pick list selection events into a separate table
It is possible to capture the date and time when an employee selects a pick list into a separate table.
Create the user table
First create the user table for the pick list selection events. Example: PMX_PLLOG user table
Set the object type to ’No object with Auto.Increment’.

Add the user defined fields to the table. In the example we will add the following fields:
| Title | Description | Type |
|---|---|---|
| Date | Date | Date/Time |
| Time | Time | Numeric |
| EmpID | Employee ID | Alphanumeric |
| EmpName | Employee Name | Alphanumeric |
| PLN | Pick List | Numeric |
Create the user query
The user query name is: BXMobileWH9_PickingScreen_OK_clicked
SQL
INSERT INTO "@PMX_PLLOG" ("Name", "U_Date", "U_Time", "U_EmpID", "U_EmpName", "U_PLN")
values ('Pick List Entry', cast(getdate() as date), cast(substring(CONVERT(VARCHAR,GETDATE(),108),1,2) * 100 + substring(CONVERT(VARCHAR,GETDATE(),108),4,2) as int), $[Employee.EmployeeID], $[Employee.FirstName]+ ' '+  $[Employee.LastName], SUBSTRING($[DataRepeater.SelectedUIPickListNo], CHARINDEX('#', $[DataRepeater.SelectedUIPickListNo]) + 1, LEN($[DataRepeater.SelectedUIPickListNo]) - CHARINDEX('#', $[DataRepeater.SelectedUIPickListNo])))
HANA
INSERT INTO "@PMX_PLLOG" ("Name", "U_Date", "U_Time", "U_EmpID", "U_EmpName", "U_PLN")
values ('Pick List Entry', cast(getdate() as date), cast(substring(CONVERT(VARCHAR,GETDATE(),108),1,2) * 100 + substring(CONVERT(VARCHAR,GETDATE(),108),4,2) as int), $[Employee.EmployeeID], $[Employee.FirstName]+ ' '+  $[Employee.LastName], SUBSTRING($[DataRepeater.SelectedUIPickListNo], LOCATE($[DataRepeater.SelectedUIPickListNo], '#') + 1) FROM DUMMY´)
When the 'Pick' button is pressed, this query inserts the current date to the Date column, the current time to the Time column, the employee ID to the Employee ID column, the first and last name of the employee to the Employee Name column and the pick list number to the Pick List column.

Query Stocks
Override list
It is possible to override the list of items on the Query Stocks screen.
This is the same screen that can be opened from Pick List and from other modules in Produmex Scan when pressing the Find Stocks button, so the custom logic is also relevant for those cases.
| UserQuery: bx_mobile_wh9_querystocks_query_custom (Category: BXMobileWH9) | |
|---|---|
| Parameters $[Warehouse] $[BinLocation] $[ItemCode] $[BatchNumber] ($[..] - other user fields from screen) | Results A table with multiple rows with specific column names: - Warehouse - BinLocation - ItemCode - ItemName - ManagedBy (Batch: 10000044, Serial: 10000045, None: -1) - OnHandQuantity (in inventory UoM) |
Example:
This custom query returns items sorted by quantity (descending).
Please note: This query doesn't filter by batch input parameter, only Warehouse, ItemCode and BinLocation.
Query name: bx_mobile_wh9_querystocks_query_custom
-- return maximum 20(+20) matches by filters, ordered by quantity descending
-- first select is for bin-activated warehouses
SELECT TOP 20 OIBQ.WhsCode as Warehouse, OBIN.BinCode as BinLocation, OIBQ.ItemCode, OITM.ItemName,
CASE
	WHEN OITM.ManSerNum = 'Y' THEN 10000045
	WHEN OITM.ManBtchNum = 'Y' THEN 10000044
	ELSE -1 END as ManagedBy, OIBQ.OnHandQty as OnHandQuantity FROM OIBQ
JOIN OBIN ON (OBIN.AbsEntry = OIBQ.BinAbs)
JOIN OITM ON (OITM.ItemCode = OIBQ.ItemCode)
WHERE (OIBQ.ItemCode = $[ItemCode] OR $[ItemCode] = '')
	AND (OIBQ.WhsCode = $[Warehouse] OR $[Warehouse] = '')
	AND (OBIN.BinCode = $[BinLocation] OR $[BinLocation] = '')
	AND OnHandQty > 0
UNION
-- this second select is for non-bin warehouses
SELECT TOP 20 OITW.WhsCode as Warehouse, '' as BinLocation, OITW.ItemCode, OITM.ItemName,
CASE
	WHEN OITM.ManSerNum = 'Y' THEN 10000045
	WHEN OITM.ManBtchNum = 'Y' THEN 10000044
	ELSE -1 END as ManagedBy, OITW.OnHand as OnHandQuantity FROM OITW
JOIN OITM ON (OITM.ItemCode = OITW.ItemCode)
JOIN OWHS ON (OWHS.WhsCode = OITW.WhsCode)
WHERE OWHS.BinActivat = 'N'
	AND (OITW.ItemCode = $[ItemCode] OR $[ItemCode] = '')
	AND (OITW.WhsCode = $[Warehouse] OR $[Warehouse] = '')
-- order by quantity descending
ORDER BY OnHandQuantity DESC
General for multiple processes
Creating documents as drafts
It is possible to control whether the documents should be created as drafts or as real documents when posted from Produmex Scan for the following documents:
| Document | Doc. type |
|---|---|
| Delivery | 15 |
| Sales Order (by BN Create SO function) | 17 |
| Goods Receipt PO | 20 |
| Goods Issue | 60 |
The controlling logic must be defined with a user query.
| UserQuery: bx_mobile_wh9_document_creation_type (Category: BXMobileWH9) | |
|---|---|
| Parameters [%1]: employee ID (int) [%3]: mobile transaction head code (nvarchar) | Results The user query should return the result in a column called BXDOCTYP. The result must be an integer, and the following values are supported: - 0: real document - 1: draft |
For example, with the following logic, all goods receipt PO documents (doc. type = 20) will be created as drafts, while the other documents are created as real documents:
MS SQL
SELECT CASE T0.[U_BXPDocTy]
WHEN 20 THEN 1
ELSE 0 END as 'BXDOCTYP'
FROM [dbo].[@BXPLMSMOBTHD] T0 WHERE T0.[Code] = [%3]
HANA
SELECT
case
T0."U_BXPDocTy" when 20 then 1
else 0
end as "BXDOCTYP"
FROM "@BXPLMSMOBTHD" T0 WHERE T0."Code" = [%3]
2.5.2.Special field for series numbering
A user field for series numbering can be added to screens where a Post event starts.
Field name: BO_Series
Example: Add a user field for numbering series to the GR PO screen
Add the following record to the Customization Fields user table:
| Screen | Module | Label | Field Name | Read Only |
|---|---|---|---|---|
| GoodsReceiptPOPostSelectionScreen | BXMobileWH9 | Series numbering | BO_Series | No |
2.5.3.Capture login events into a separate table
It is possible to capture the date and time of the employee login and logout events in a separate user table.
Create the user table
First create the user table for the log in and log out events. Example: PMX_EMPLOG user table
Set the object type to ’No object with Auto.Increment’.

Add the user defined fields to the table. In the example we will add the following fields:
| Title | Description | Type |
|---|---|---|
| Date | Date | Date/Time |
| Time | Time | Numeric |
| EmpID | Employee ID | Alphanumeric |
| EmpName | Employee Name | Alphanumeric |
Create the user query
The user query name for the log in is: BXMobileWH9_LoginScreen_OK_clicked
SQL
INSERT INTO "@PMX_EMPLOG" ("Name", "U_Date", "U_Time", "U_EmpID", "U_EmpName")
values ('Login', cast(getdate() as date), cast(substring(CONVERT(VARCHAR,GETDATE(),108),1,2) * 100 + substring(CONVERT(VARCHAR,GETDATE(),108),4,2) as int), $[TextUser], $[TextUserName])
HANA
INSERT INTO "@PMX_EMPLOG" ("Name", "U_Date", "U_Time", "U_EmpID", "U_EmpName")
values ('Login', cast(current_timestamp as date), TO_INT( TO_VARCHAR( CURRENT_TIMESTAMP, 'HH24MI' ) ), $[TextUser], $[TextUserName])
This query inserts the current date to the Date column, the current time to the Time column, the employee ID to the Employee ID column, the first and last name of the employee to the Employee Name column and the event name in the Name column.

Special customization
You can use this special customization to manipulate the loaded data.
Special customization queries
Query Stocks
| User query: bx_mobile_wh9_querystocks_query_custom | |
|---|---|
| Parameters $[ItemCode], $[Warehouse] | Query fields Warehouse, BinLocation, ItemCode, ItemName, ManagedBy, OnHandQuantity |
This example will order the result by batch number.
SELECT TOP 20 OIBQ.WhsCode as Warehouse, OBIN.BinCode as BinLocation, OIBQ.ItemCode, OITM.ItemName,
CASE
	WHEN OITM.ManSerNum = 'Y' THEN 10000045
	WHEN OITM.ManBtchNum = 'Y' THEN 10000044
	ELSE -1 END as ManagedBy, OIBQ.OnHandQty as OnHandQuantity
FROM OIBQ
    JOIN OBIN ON (OBIN.AbsEntry = OIBQ.BinAbs)
    JOIN OITM ON (OITM.ItemCode = OIBQ.ItemCode)
    JOIN OBBQ ON (OBBQ.BinAbs = OIBQ.BinAbs)
    JOIN OBTN ON (OBBQ.SnBMDAbs = OBTN.AbsEntry)
WHERE
    (OIBQ.ItemCode = $[ItemCode] OR $[ItemCode] = '')
	AND (OIBQ.WhsCode = $[Warehouse] OR $[Warehouse] = '')
	AND (OBBQ.ItemCode = $[ItemCode] OR $[ItemCode] = '')
	AND (OBBQ.WhsCode = $[Warehouse] OR $[Warehouse] = '')
	AND OIBQ.OnHandQty > 0
    AND    OBBQ.OnHandQty > 0
ORDER BY OBTN.DistNumber
2.6.1.2. Picklist
| User query: bx_mobile_wh9_picklists_query_custom | |
|---|---|
| Parameters $[AbsEntry], $[CardCode], $[EmployeeNo], $[ItemCode], $[PickDate], $[WarehouseCode], $[BinLocationCode] | Query fields AbsEntry |
On the pick list screen, you can use custom fields in the custom query.
Example:
Add a new custom field ’CFEmpID’ for employee input on the CustomizationFields table.
| Field Name | Label | Screen |
|---|---|---|
| CFEmpID | EmpID | PickingScreen |
After the field is added it can be used in a custom query. Query name: bx_mobile_wh9_picklist_query_custom
IF ($[CFEmpID]='')
BEGIN
	SELECT AbsEntry FROM OPKL WHERE Status <> 'C'
	ORDER BY AbsEntry desc
END
ELSE
BEGIN
	SELECT AbsEntry FROM OPKL WHERE Status <> 'C' AND U_BXPEmpID=$[CFEmpID]
	ORDER BY AbsEntry desc
END
Sales order lines
| User query: bx_mobile_wh9_salesorderlines_query_custom | |
|---|---|
| Parameters $[DocEntry] | Query fields LineNum, BinCode |
Sales issue
| User query: bx_mobile_wh9_salesissue_query_custom | |
|---|---|
| Parameters $[DocNum], $[CardCode], $[DueDate], $[ItemCode], $[EmployeeNo] | Query fields DocEntry, DocType (17:Sales Order; 13:A/R Reserve invoice) |
Goods Receipt PO
| User query: bx_mobile_wh9_goodsreceiptpo_query_custom | |
|---|---|
| Parameters $[DocNum], $[CardCode], $[DueDate], $[ItemCode], $[EmployeeNo] | Query fields DocEntry, DocType (18:A/P Reservere invoice; 22: Purchase Order) |
Stock Transfer Request
| User query: bx_mobile_wh9_stocktransferrequest_query_custom | |
|---|---|
| Parameters $[DocNum] $[WarehouseFrom] $[WarehouseTo] | Query fields DocEntry |
Stock Transfer Request Lines
| User query: bx_mobile_wh9_stocktransferrequestlines_query_custom | |
|---|---|
| Parameters $[DocEntry] | Query fields LineNum IsAvailable |
Customize The order of the pick list lines
This query is designed to work with both Speed Picking and Sequential Picking processes. In both cases, the system will place the picked items at the end of the list without reloading the entire item list. This behavior is intentional and should remain the standard for these picking logics to maintain consistency and efficiency.
Important Note: The “PickEntry” field and the “Order” alias are mandatory and must be used!
| User query: bx_mobile_wh9_picklistlines_query_custom | |
|---|---|
| Parameters $[AbsEntry] | Query fields PickEntry AS “Order” |
IF $[AbsEntry] IS NOT NULL
BEGIN
	SELECT PickEntry AS "Order"
	FROM PKL1 WHERE AbsEntry = $[AbsEntry]
	ORDER BY RelQtty DESC, PickEntry DESC
END
Button customization
Example:
Automatically click on the ‘Reload’ button after scanning on the GR PO screen.
Query name: BXMobileWH9_GoodsReceiptPOScreen_TextDocumentNumber_validate_after
IF $[TextDocumentNumber] <> ''
BEGIN
SELECT 'ButtonReload' as 'Click$'
END
The name of the button can be found in customization assist. A custom button also can be pressed. The two buttons at the bottom of the screen are called 'OK' and 'Option'
Custom message
You can send a message to employee is a custom event.
SELECT 'Information' as "Message$", 'I' as "MessageType$"
HANA version:
SELECT 'Information' as "Message$", 'I' as "MessageType$" FROM DUMMY
See the supported message types here: Supported message types
Other Examples
Populate Bin Location field with default item locaion in GR PO
You have to add the same query content for all item types
Query names:
BXMobileWH9_GoodsReceiptPOQuantitiesNormalScreen_Load BXMobileWH9_GoodsReceiptPOQuantitiesBatchScreen_Load BXMobileWH9_GoodsReceiptPOQuantitiesSerialScreen_Load
select
	"OBIN"."BinCode" as "TextBinLocation"
from
	"OITW"
	LEFT JOIN "OBIN" on "OITW"."DftBinAbs" = "OBIN"."AbsEntry"
where
	"OITW"."ItemCode" = $[SelectedPurchaseOrderLine.ItemCode]
	and "OITW"."WhsCode" = $[SelectedPurchaseOrderLine.WarehouseCode]
2.7.2. Delete the document number in screen load event in GR PO Screen
You have to add an SAP query with the name of the screen load event Query names:
BXMobileWH9_GoodsReceiptPOScreen_Load
select '' as "TextDocumentNumber"
Auto print Delivery in Sales Issue process
It is possible to use the ButtonPost_click_after event to trigger the printing. The SAP document is already created in this event. The number of the new Delivery is not available in the customization, so we can only print the last Delivery document that was created by the logged in employee.
You can see the configuration steps below.
- Locate the Delivery note from the “Report and Layout Manager”

- Open it in Crystal Reports Designer.
- Set the database configuration for the report file and save a copy from the report.
- Check the paramters of the report file, we need them in the custom query.

-import the report file into SBO by function “Report and Layout Manager”
- Create the custom query
- Use the SBO Report ID in column: “PrintLayout$”
- Set all properties in a new column by addind “Print_” prefix
- Set the printer name in column: “PrintPrinter$”
- Send a message about the printing in columns “Message$” and “MessageType$”
SELECT TOP 1
	'RCRI0013' as "PrintLayout$",
	"DocEntry" as "Print_DocKey@",
	15 as "Print_ObjectId@",
	'Bullzip PDF Printer' as "PrintPrinter$",
	'Delivey is Printed'  "Message$", 'I' "MessageType$"
FROM
	"ODLN"
WHERE
	"U_BXPEmpID" = $[Employee.EmployeeID]
ORDER BY "DocEntry" DESC
- The name od the query must be: BXMobileWH9_SalesIssueScreen_ButtonPost_click_after
- Produmex Scan application must be restarted after adding the new customization
- Since the report file contains sub reports you may enable it in the setting below. You can find more information about this setting on the url below
Advanced printing configurations

In the Picking process you can use the query name below:
BXMobileWH9_PickingLinesScreen_ButtonDeliver_click_after
The PickingLineScreen will be closed after createing the Delivery and the event won't be able to use objects from the PickingLineScreen anymore. It is necessary to check the setting below in order to prevent closing the screen.
“Don't close screen after picking delivery”
Capture GRPO Images
Overview
The Image Capture allows Produmex Scan to attach photos directly to incoming logistics documents such as Goods Receipt PO and Sales Return.
Captured images are:
- Saved into SAP’s Attachment system using a structured file name format.
- Linked in Produmex Scan internal tables for reference (note: after posting, the file path is no longer stored in the Scan table).
Supported document flows:
- GRPO
- Free GRPO
- Sales Returns (SDN and SRR)
How Image Capture Works
When enabled, users can take one or more pictures directly from the scanning flow. Images are validated, saved to SAP’s attachment path, and linked to the document line.
The Image Capture process has three major steps:
- When a picture is taken, it is stored in the device’s memory.
- When the entry is created, the image is saved to the database.
- After the document is posted, the image is saved as a JPG file in the attachments folder and then it will be removed from the database.
The capture behavior depends on the warehouse setup and item type:
| Warehouse / Item Type | Capture Location |
|---|---|
| Bin-managed warehouse | Detail screen (bin/batch/serial screen) |
| Non-bin-managed warehouse + batch/serial item | Batch/serial detail screen |
| Non-bin-managed warehouse + normal item | Line screen (when line is selected) |
GR PO - Image Capturing is enabled on the Mobile Client:

Produmex Scan Settings
An additional setting for the image capturing called Produmex Scan Media is available on the Produmex Scan Setting screen.
This tab allows users to configure:
- Capturing behavior
- File naming conventions
- Image limits

Attachment file name format
- Default: <UserName>_<DocEntry>_<LineNum>_<BatchOrSerial>_<Timestamp>.jpg
- Defines how each attachment file is named. Unsupported characters or spaces are automatically replaced with underscores (_).
- The file name must include the following placeholders: <UserName>, <DocEntry>, <LineNum>, and <Timestamp>
- The order of the placeholders can be changed, and additional text can be added to the file name.
- <BatchOrSerial> is optional.
- <UserName> = Employee ID.
- <Timestamp> = UTC datetime or any other datetime that was set.
- .jpg is required.
Attachment maximum file size (MB)
- Default: 3 MB
- It can be modified, images larger than the set limit cannot be captured or uploaded.
Capture images for incoming documents
- Default: Unchecked
- When enabled, image capture becomes available for GRPO, Free GRPO, and Sales Returns flows.
Maximum number of attached images per incoming document
- Default: 20
- Restricts the total number of photos per document.
Show preview when capturing images
- Default: Checked
- The CameraApp will always display a preview before saving, regardless of this setting.
Once the document is posted, the physical file is saved under SAP General Settings → Path for Attachments. The file name is generated using the defined template, and Produmex Scan stores the final file path in its internal tables.

Valid Value Selection Screen
Overview
The Valid Value Selection Screen allows custom Produmex Scan screens to replace free-text inputs with predefined, easy-to-select values. The selection screen can be applied to an existing input field or added as a new field, and is fully supported on both Android and Windows Mobile devices.
How the Valid Value Selection Screen Works
The valid value selection screen uses Valid Values to populate the selectable list.
The Default Value field specifies which key should be preselected when the screen loads.
Optional user queries can fully override the valid values or default value:
- BXMobileWH9_<ScreenName>_<ControlName>_<InternalDataLoad> - Returns the list of valid values.
- BXMobileWH9_<ScreenName>_<ControlName>_<DefaultValue> - Returns the default value key.
Note: If these queries are defined, their results take priority over the standard field configuration.
How to Create a Customized Valid Value Selection Screen
1. Open Customization Fields
- In SAP Business One, navigate to: Produmex Scan → Customization → Customization Fields

2. Set Field Type to Choose from List
In the Field Type column, select Choose from List. This tells Produmex Scan to use a Choose from List instead of a text field.
3. Define Valid Values
The user can define valid values in either of the following ways:
- Option A - Enter key-value pairs directly
- Use the Valid Values field and provide pairs in the format: KEY1:Value 1,KEY2:Value 2,KEY3:Value 3
- Example: 1:Valid Value 1,2:Valid Value 2

- Option B - Use a user query
- Enter the name of an SAP user query
- If the query BXMobileWH9_<ScreenName>_<ControlName>_load_values is defined, it will override the field, the load_values query is used to retrieve the valid values. The query must return a key–value pair, and the returned value will be used as the default.
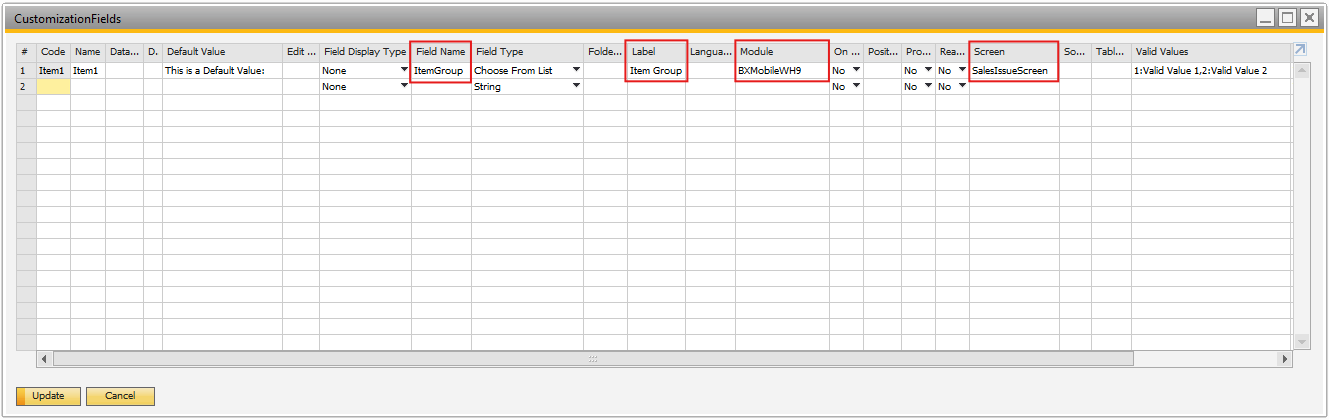
Filtering Sales Orders by Item Group
This example shows how the Valid Value Selection screen can be used to filter Sales Orders based on Item Groups.
Based on the example image let's create a custom query that contains the following:
- Field Name: ItemGroup
- Label: Item Group
- Module: BXMobileWH9
- Screen: SalesIssueScreen

Step 1: Displaying a List of Valid Values
Select a list of valid values that will be displayed:
 Open the Query Manager and create a query:
BXMobileWH9_SalesIssueScreen_ItemGroup_load_values
Insert the content:
select
    ItmsGrpCod as "Key",
    ItmsGrpNam as "Value"
from OITB
Step 2: Selecting and saving a Value from the List
When the user selects an Item Group from the Valid Value Selection Screen:
- The selected Item Group Code is stored by the system
- This stored value is later used to filter Sales Orders

Open the Query Manager and create a query:
BXMobileWH9_SalesIssueScreen_ItemGroup_validate
Insert the content:
UPDATE OHEM
SET U_TEST = $[ItemGroup]
WHERE "empID" = $[Employee.EmployeeID]
Step 3: Reloading the Sales Order Screen
Pressing Reload will show:
- Open Sales Orders
- Only those Sales Orders that contain items from the selected Item Group

Open the Query Manager and create a query:
bx_mobile_wh9_salesissue_query_custom
Insert the content:
select distinct
    RDR1.DocEntry,
    17 as DocType
from RDR1
left join OITM on RDR1.ItemCode = OITM.ItemCode
left join ORDR on ORDR.DocEntry = RDR1.DocEntry
where
    LineStatus = 'O'
    and OITM.ItmsGrpCod in (
        select U_TEST
        from OHEM
        where empID = $[EmployeeNo]
    )
Step 4: Save and see the result
The Valid Value Selection Screen provides a simple and reliable way to:
- Display a list of valid values from the database
- Let users select a value instead of typing manually
- Save the selected value
- Automatically filter data on other screens


4. Set a Default Value
The user can define a default value in one of the following ways:
- Option A – Manual Default Value
- In the Default Value field, you can manually enter the text that should be displayed.
- Example: “This is a Default Value”
- Option B – Using a User Query
- A default value can be provided using a user query. The query can be the following for example: BXMobileWH9_<SalesIssueScreen>_<ItemGroup>_load_default_value
Customization Example: Micro-Vertical Solution for Serial Numbered Appliance Trading Organizations
This document describes how the Free Goods Receipt PO process in Produmex Scan was customized to fit a typical client and form a part of the micro-vertical solution for serial numbered appliance trader and similar companies. The customizations for each screen are described in detail.
Free Goods Receipt PO

In Produmex Scan, the Free Goods Receipt PO consist of 3 screens: a main screen used to start creating and preparing a new Goods Receipt document, a screen showing item lines and quantities and a detail screen on which the receiving bin location and serial numbers can be specified.
In standard Produmex Scan, these screens are optimized for receiving items sequentially, that is, start receiving ITEM1, enter to location, quantities or serial numbers, then start receiving ITEM2, enter location, quantities or serial numbers. This is a good solution in many cases when there are a couple of different items being received and they are grouped.
However, in this micro vertical solution the typical customer wants to receive many different items, a kind of assortment, which are not grouped by item code, maybe only by similar items. These items are also mostly serial numbered, which means the standard Produmex Scan way of receiving requires a lot of extra actions on the mobile user interface. The goal here was to allow the warehouse worker to use the bar code scanner button 99% of the time when doing the receiving. In practice this means: he will take the next piece of item (boxed), scan the item code bar code, then scan the serial number bar code, and then move on to the next piece of item (boxed).
During receipt, the items are moved to a temporary bin location, which is an empty pallet labelled with a bin code. When a pallet is full the warehouse worker can change the bin location to the next temporary bin location, the next pallet's location. In a later step, these pallets are moved to shelves with a forklift and the Produmex Scan Mass Transfer function, which moves all the stocks on one bin to another.
Comparison of the Original and New Receiving
Below you can see the original process for receiving.
The extra steps that this micro-vertical solution eliminates have been colored.
If we look at just the main action (from Set warehouse to just before Finish), receiving 10 serial items takes 10 x 5 = 50 actions this way. It needs 3 bar code scans (item, to bin, serial number) and 2 button presses (Add, Done) per item piece.

The following picture shows you the new process with these steps eliminated.
The core steps of receiving 10 items means 10 x 2 = 20 steps, plus changing the destination palette (to bin) occasionally. Even better, these actions are all bar code scans (item code, serial number), only 2 per item.
This shows how we optimized the process. Please also note, that there are other types of companies who might receive only a few different serial numbered items at once, for them, the original Produmex Scan process of scanning one item code then scanning a lot of serial numbers is much more effective.

Main Screen

Changes:
- Added Ref. No. field which will be copied to the new Delivery document. The user queries and custom fields for the above custom logic:
| Field Name | Label | Screen |
|---|---|---|
| BO_NumAtCard | Ref.No. | CreateGoodsReceiptPOScreen |
Item Lines Screen

Changes:
1. List items are changed to show Item Code + Item Name without prefix and to show bar code (EAN) in the second line instead of warehouse.
2. The warehouse is filled by the last selected warehouse for the employee by default and the value is saved if it has changed.
3. After the item has been scanned, it is checked if that item has any open Purchase Orders from the same supplier. If the item was valid and there are no problems, after scanning item code or bar code the screen automatically opens the next (bin locations) screen. No need to press the Add button explicitly.
4. The Add button checks if there is still open quantity for the given item from the same supplier. It gives a warning if there are no more open quantities.
5. UoM field is hidden because it's not used.

The user queries and custom fields for the above custom logic:
1.
User query: BXMobileWH9_CreateGoodsReceiptPOLinesScreen_DataRepeater_InternalDataLoad
-- Fill UIItem with item code and name
-- and UIWarehouse with OITM.CodeBars in list
SELECT SUBSTRING (S.splitdata,7,50) AS [DataRepeater.UIItem], C.CodeBars AS [DataRepeater.UIWarehouse]
FROM dbo.SplitStringForDataRepeater($[DataRepeater.UIItem]) S, OITM C
WHERE C.ItemCode=SUBSTRING(S.splitdata,7,PATINDEX('%*%',S.splitdata)-8)
2.
Create a new user table 'SCANEMPWH' with the following fields:
- To Bin Location (ToWH)
- Employee ID (empID)
User query: BXMobileWH9_CreateGoodsReceiptPOLinesScreen_TextWarehouse_validate_after
-- Save Warehouse value to remember it for next time
IF (SELECT ISNULL([@SCANEMPWH].U_ToWH,'')
FROM [@SCANEMPWH] WHERE U_empID = $[Employee.EmployeeID]) <> $[TextWarehouse]
UPDATE [@SCANEMPWH] SET [U_ToWH]=$[TextWarehouse] WHERE U_empID = $[Employee.EmployeeID]
3.
User query: BXMobileWH9_CreateGoodsReceiptPOLinesScreen_TextItem_validate
-- Check Item and see if it has open quantity in Purchase orders from this supplier
-- if not, show error message
DECLARE @itemcode nvarchar (MAX)
SET @itemcode = $[TextItem]

IF NOT EXISTS SELECT (T0.ItemCode FROM OITM T0 WHERE T0.ItemCode=@itemcode)
SELECT @itemcode=T1.ItemCode FROM OBCD T1 WHERE T1.BCdCode=@itemcode

IF @itemcode<>'' AND (SELECT ISNULL (SUM(T1.[OpenQTX]),0) FROM OPOR T0
INNER JOIN POR1 T1 ON T0.[DocEntry] = T1.[DocEntry]
WHERE T1.[ItemCode] = @itemcode AND T0.[CardCode] = LEFT($[TextSupplier],PATINDEX('%*%',$[TextSupplier])-1))=0
SELECT 'There is no Purchase Order for '+@itemcode AS 'Message$', 'E' AS 'MessageType$'
ELSE SELECT '' AS dummy
User query: BXMobileWH9_CreateGoodsReceiptPOLinesScreen_TextItem_validate_after
-- If item is filled then set quantity to empty and press Add automatically
IF $[TextItem]<>'' SELECT '' AS TextQuantity, 'ButtonAdd' AS Click$
4.
User query: BXMobileWH9_CreateGoodsReceiptPOLinesScreen_ButtonAdd_click
-- When add button is pressed check if there is open quantity
-- for that item in Purchase Orders
DECLARE @itemcode nvarchar(MAX)
SET @itemcode = $[TextItem]
IF NOT EXISTS (SELECT T0.ItemCode FROM OITM T0 WHERE T0.ItemCode=@itemcode)
SELECT @itemcode=T1.ItemCode FROM OBVD T1 WHERE T1.BCdCode=@itemcode

IF (SELECT SUM(CAST(LEFT(S.splitdata2,PATINDEX('% %',Splitdata2)-1) AS DECIMAL (1,5)))
FROM dbo.SplitStringForDataRepeater2($[DataRepeater.UIItem],$[DataRepeater.UIQuantity]) S
WHERE @itemcode=SUBSTRING(S.splitdata,1,PATINDEX('%*%',S.splitdatda)-1))>=(SELECT ISNULL (SUM(T1.[OpenQty]),0) FROM OPOR T0.[CardCode]=LEFT($[TextSupplier],PATINDEX('%*%',$[TextSupplier])-1))
SELECT 'There is no more PO for this item. Continue?' AS 'Message$', 'YM' AS 'MessageType$'
5.
To hide the UoM item on the screen, add a record to the Customization Fields(BXPCUSTFD) user table:
| FieldName | Visible | Screen |
|---|---|---|
| TextUoM | NO | CreateGoodsReceiptPOLinesScreen |
Serial Numbers Screen

Changes:
1. Save the last bin for next time and load it with last value
2. New field: EAN (Item's bar code) added and loaded with data
3., 4. After serial number has been scanned, automatically press the Done button to go to previous screen
The user queries and custom fields needed for these are:
1.
Create a new user table 'SCANEMPBL' with the following fields:
- To Bin Location (ToBL)
- Employee ID (empID)
User query: BXMobileWH9_CreateGoodsReceiptPOQuantitiesSerialScreen_TextBinLocation_validate_after
-- Save Bin Location from screen to employee so it can be loaded next time
IF (SELECT ISNULL([@SCANEMPBL].U_ToBL,'')
FROM [@SCANEMPBL] WHERE U_empID = $[Employee.EmployeeID]) <> $[TextBinLocation]
UPDATE [@SCANEMPBL] SET [U_ToBL]=$[TextBinLocation] WHERE U_empID = $[Employee.EmployeeID]
1., 2.
User query: BXMobileWH9_CreateGoodsReceiptPOQuantitiesSerialScreen_Load
-- On screen load fill bin location from saved value
-- and fill EAN field from OITM.CodeBars
SELECT
(SELECT [@SCANEMPBL].U_ToBL FROM [@SCANEMPBL] WHERE U_empID = $[Employee.EmployeeID]) AS 'TextBinLocation',
(SELECT CodeBars FROM OITM
WHERE ItemCode=SUBSTRING($[TextItem],1,PATINDEX('%*%',$[TextItem])-2) ) AS 'EanCode'
2.
To show the new EAN field on the screen, add a record to the Customization Fields(BXPCUSTFD) user table:
| FieldName | Label | ReadOnly | Screen |
|---|---|---|---|
| EanCode | EAN | YES | CreateGoodsReceiptPOQuantitiesSerialScreen |
3., 4.
User query: BXMoblieWH9_CreateGoodsReceiptPOQuantitiesSerialScreen_TextSerial_validate_after
-- After the serial number has been scanned,
-- press OK button to go back to previous screen
IF $[TextSerial]<>'' SELECT 'OK' AS Click$
3.1.5. Regular Items Screen

Changes:
1. New field: EAN (Item's bar code) added and loaded with data
2. Save the last bin for next time and load it with last value
3. Set quantity to 1 by default and focus on quantity
4., 5. When the Add button is pressed automatically press Done to go back to previous screen
6. UoM field is hidden because it's not used
The user queries and custom fields needed for these are:
1., 2., 3.
Create a new user table 'SCANEMPBL' with the following fields:
- To Bin Location (ToBL)
- Employee ID (empID)
User query: BXMobileWH9_CreateGoodsReceiptPOQuantitiesNormalScreen_Load
-- When screen is loaded fill bin location with last value
-- fill EAN with bar code from OITM, set quantit to 1 and
-- focus on Quantity field
SELECT
(SELECT CodeBars FROM OITM WHERE ItemCode=SUBSTRING($[TextItem],1,PATINDEX('%*%',$[TextItem])-2) ) AS 'EanCode',
(SELECT [@SCANEMPBL].U_ToBL FROM [@SCANEMPBL] WHERE U_empID = $[Employee.EmployeeID]) AS 'TextBinLocation',
'1' AS 'TextQuantity',
'TextQuantity' AS Click$
2.
User query: BXMobileWH9_CreateGoodsReceiptPOQuantitiesNormalScreen_TextBinLocation_validate_after
-- Save bin location for next time
IF (SELECT ISNULL([@SCANEMPBL].U_ToBL,'')
FROM [@SCANEMPBL] WHERE U_empID = $[Employee.EmployeeID]) <> $[TextBinLocation]
UPDATE [@SCANEMPBL] SET [U_ToBL]=$[TextBinLocation] WHERE U_empID = $[Employee.EmployeeID]
4., 5.
User query: BXMobileWH9_CreateGoodsReceiptPOQuantitiesNormalScreen_ButtonAdd_click_after
-- When Add button is pressed, automatically press OK to close screen
SELECT 'OK' AS Click$
2., 6.
To show the new EAN field on the screen and hide UoM, add record to the Customization Fields(BXPCUSTFD) user table:
| FieldName | Label | ReadOnly | Visible | Screen |
|---|---|---|---|---|
| EanCode | EAN | YES | YES | CreateGoodsReceiptPOQuantitiesNormalScreen |
| TextUoM | NO | CreateGoodsReceiptPOQuantitiesNormalScreen |
Helper SQL procedures
Produmex Scan List splitting 1
CREATE FUNCTION [dbo]. [SplitStringForDataRepeater] ( @string NVARCHAR (MAX))
RETURNS @output TABLE (splitdata NVARCHAR (MAX))
BEGIN
	DECLARE @START INT, @END INT
	SELECT @START = 1, @END = CHARINDEX ('##', @string)
	WHILE @START < LEN (@string) + 1 BEGIN
		IF @END = 0
			SET @END = LEN (@string) + 2
		INSERT INTO @output (splitdata)
		VALUES (SUBSTRING(@string, @START, @END - @START))
		SET @START = @END + 2
		SET @END = CHARINDEX('##', @string, @START)
	END
	RETURN
END
Produmex Scan List splitting 2
CREATE FUNCTION [dbo]. [SplitStringForDataRepeater2] ( @string NVARCHAR (MAX), @string2 NVARCHAR (MAX))
RETURNS @output TABLE (splitdata NVARCHAR (MAX), splitdata2 NVARCHAR (MAX))
BEGIN
	DECLARE @START INT, @END INT @start2 INT, @end2 INT
	SELECT @START = 1, @END = CHARINDEX ('##', @string) , @start2 = 1, @end2 = CHARINDEX ('##', @string2)
	WHILE @START < LEN (@string) + 1 BEGIN
		IF @END = 0
			BEGIN
				SET @END = LEN (@string) + 2
				SET @end2 = LEN (@string) + 2
				END
		INSERT INTO @output (splitdata, splitdata2)
		VALUES (SUBSTRING(@string, @START, @END - @START) ,SUBSTRING(@string2, @start2, @end2 - @start2))
		SET @START = @END + 2
		SET @END = CHARINDEX('##', @string, @START)
		SET @start2 = @end2 + 2
		SET @END = CHARINDEX('##', @string2, @start2)
	END
	RETURN
END
Customizing serial number management in Produmex Scan
This document provides examples for serial number management customization in Produmex Scan. For more information about the general customization method please see: Customization Technology in Produmex Scan
User-Defined Fields
Goods Receipt
Goods Receipt PO Lines Screen
Add the following record to the Customization Fields user table:
| FieldName | Visible | Screen |
|---|---|---|
| TextUoM | NO | GoodsReceiptPOLinesScreen |
Item code field must be scanned before Add button click
Query name: BXMobileWH9_GoodsReceiptPOLinesScreen_ButtonAdd_click
IF $[TextItem] =''
SELECT 'You must scan an item first!' AS 'Message$', 'E' AS 'MessageType$', 'TextItem' AS Click$
Item code field must be scanned before Update button click
Query name: BXMobileWH9_GoodsReceiptPOLinesScreen_ButtonUpdate_click
IF $[TextItem] =''
SELECT 'Please scan an item!' AS 'Message$', 'E' AS 'MessageType$', 'TextItem' AS Click$
Focus on Item field (when returning to this screen)
Query name: BXMobileWH9_GoodsReceiptPOLinesScreen_Activate
SELECT 'TextItem' AS Click$
Change contents of the list, show bar code instead of WH text
Query name: BXMobileWH9_GoodsReceiptPOLinesScreen_DataRepeater_InternalDataLoad
SELECT
SUBSTRING(S.splitdata,1,50) AS [DataRepeater.UIItemCode],
C.CodeBars AS [DataRepeater.UIWarehouse]
FROM dbo.SplitStringForDataRepeater($[DataRepeater.UIItemCode]) S, OITM C
WHERE C.ItemCode=SUBSTRING(S.splitdata,1,PATINDEX('%*%',S.splitdata)-2)
After Item field has been entered write ' ' to quantity and press Add button
Query name: BXMobileWH9_GoodsReceiptPOLinesScreen_TextItem_validate_after
IF $[TextItem]<>'' SELECT '' AS TextQuantity, 'ButtonAdd' AS Click$
Goods Receipt PO Quantities Serial Screen
Add the following record to the Customization Fields user table:
| FieldName | Label | ReadOnly | Screen |
|---|---|---|---|
| EanCode | EAN | YES | GoodsReceiptPOQuantitiesSerialScreen |
Create a new user table ‘SCANEMPBL’ with the following fields:
- Employee ID (empID)
- To Bin Location (ToBL)
Load bin location for employee, fill EanCode with bar code
Query name: BXMobileWH9_GoodsReceiptPOQuantitiesSerialScreen_Load
SELECT
(SELECT [@SCANEMPBL].U_ToBL FROM [@SCANEMPBL] WHERE U_empID = $[Employee.EmployeeID]) AS 'TextBinLocation',
(SELECT CodeBars FROM OITM WHERE ItemCode=SUBSTRING($[TextItem],1,PATINDEX('%*%',$[TextItem])-2) ) AS 'EanCode'
Save the Bin Location value for next time
Query name: BXMobileWH9_GoodsReceiptPOQuantitiesSerialScreen_TextBinLocation_validate_after
IF (SELECT ISNULL(OHEM.U_ToBL,'') FROM OHEM
WHERE empID = $[Employee.EmployeeID]) <> $[TextBinLocation]
UPDATE OHEM SET [U_ToBL]=$[TextBinLocation] WHERE empID = $[Employee.EmployeeID]
After serial number was specified press OK to go back
Query name: BXMobileWH9_GoodsReceiptPOQuantitiesSerialScreen_TextSerial_validate_after
IF $[TextSerial]<>'' SELECT 'OK' AS Click$
Goods Receipt PO Quantities Normal Screen
Add the following record to the Customization Fields user table:
| FieldName | Label | ReadOnly | Screen |
|---|---|---|---|
| EanCode | EAN | YES | GoodsReceiptPOQuantitiesNormalScreen |
| FieldName | Visible | Screen | |
| TextUoM | NO | GoodsReceiptPOQuantitiesNormalScreen | |
Create a new user table ‘SCANEMPBL’ with the following fields:
- Employee ID (empID)
- To Bin Location (ToBL)
Save the Bin Location value for next time
Query name: BXMobileWH9_GoodsReceiptPOQuantitiesNormalScreen_TextBinLocation_validate_after
IF (SELECT ISNULL([@SCANEMPBL].U_ToBL,'')
FROM [@SCANEMPBL] WHERE U_empID = $[Employee.EmployeeID]) <> $[TextBinLocation]
UPDATE [@SCANEMPBL] SET [U_ToBL]=$[TextBinLocation] WHERE U_empID = $[Employee.EmployeeID]
Load last location for employee, EAN bar code, set quantity to 1 and focus on quantity
Query name: BXMobileWH9_GoodsReceiptPOQuantitiesNormalScreen_Load
SELECT
(SELECT CodeBars FROM OITM
WHERE ItemCode=SUBSTRING($[TextItem],1,PATINDEX('%*%',$[TextItem])-2) ) AS 'EanCode',
(SELECT [@SCANEMPBL].U_ToBL FROM [@SCANEMPBL]  WHERE U_empID = $[Employee.EmployeeID]) AS 'TextBinLocation', '1' AS 'TextQuantity' ,'TextQuantity' AS Click$
After the Add button press OK to go back
Query name: BXMobileWH9_GoodsReceiptPOQuantitiesNormalScreen_ButtonAdd_click_after
SELECT 'OK' AS Click$
Free Goods Receipt
CreateGoodsReceiptPOLinesScreen
Add the following record to the Customization Fields user table:
| FieldName | Visible | Screen |
|---|---|---|
| TextUoM | NO | GoodsReceiptReceiptLinesScreen |
Create a new user table ‘SCANEMPWH’ with the following fields:
- Employee ID (empID)
- To Warehouse (ToWh)
Load saved warehouse for employee, focus on item
Query name: BXMobileWH9_CreateGoodsReceiptPOLinesScreen_Load
SELECT
(SELECT [@SCANEMPWH].U_ToWh FROM [@SCANEMPWH] WHERE U_empID = $[Employee.EmployeeID]) AS 'TextWarehouse',
'TextItem' AS Click$
Focus on item (after returning to this screen) Query name: BXMobileWH9_CreateGoodsReceiptPOLinesScreen_Activate
SELECT 'TextItem' AS Click$
Modify list contents
Query name: BXMobileWH9_CreateGoodsReceiptPOLinesScreen_DataRepeater_InternalDataLoad
-- Modify list contents:
-- [DataRepeater.UIItem] Item code + name
-- [DataRepeater.UIWarehouse] Bar code (EAN)
SELECT SUBSTRING(S.splitdata,7,50) AS [DataRepeater.UIItem], C.CodeBars AS [DataRepeater.UIWarehouse]
FROM dbo.SplitStringForDataRepeater($[DataRepeater.UIItem]) S, OITM C
WHERE C.ItemCode=SUBSTRING(S.splitdata,7,PATINDEX('%*%',S.splitdata)-8)
Save warehouse for employee
Query name: BXMobileWH9_CreateGoodsReceiptPOLinesScreen_TextWarehouse_validate_after
IF (SELECT ISNULL([@SCANEMPWH].U_ToWh,'')
FROM [@SCANEMPWH]
WHERE U_empID = $[Employee.EmployeeID]) <> $[TextWarehouse]
UPDATE [@SCANEMPWH]
SET [U_ToWh]=$[TextWarehouse]
WHERE U_empID = $[Employee.EmployeeID]
Check if item has been ordered/open quantity from this supplier
Query name: BXMobileWH9_CreateGoodsReceiptPOLinesScreen_TextItem_validate
DECLARE @itemcode nvarchar(MAX)
SET @itemcode = $[TextItem]
IF NOT EXISTS (SELECT T0.ItemCode FROM OITM T0 WHERE T0.ItemCode=@itemcode)
SELECT @itemcode=T1.ItemCode FROM OBCD T1 WHERE T1.BcdCode=@itemcode
IF @itemcode<>'' AND (SELECT ISNULL(SUM(T1.[OpenQty]),0) FROM OPOR T0
INNER JOIN POR1 T1 ON T0.[DocEntry] = T1.[DocEntry] WHERE T1.[ItemCode] =@itemcode AND T0.[CardCode] = LEFT($[TextSupplier],PATINDEX('%*%',$[TextSupplier])-1))=0
SELECT 'There is no Purchase Order: '+ @itemcode AS 'Message$', 'E' AS 'MessageType$'
ELSE SELECT '' AS dummy
Check if item has been ordered/open quantity from this supplier
Query name: BXMobileWH9_CreateGoodsReceiptPOLinesScreen_TextItem_validate
DECLARE @itemcode nvarchar(MAX)
SET @itemcode = $[TextItem]
IF NOT EXISTS (SELECT T0.ItemCode FROM OITM T0 WHERE T0.ItemCode=@itemcode)
SELECT @itemcode=T1.ItemCode FROM OBCD T1 WHERE T1.BcdCode=@itemcode
IF @itemcode<>'' AND (SELECT ISNULL(SUM(T1.[OpenQty]),0) FROM OPOR T0
INNER JOIN POR1 T1 ON T0.[DocEntry] = T1.[DocEntry] WHERE T1.[ItemCode] =@itemcode AND T0.[CardCode] =LEFT($[TextSupplier],PATINDEX('%*%',$[TextSupplier])-1))=0
SELECT 'There is no Purchase Order: '+ @itemcode AS 'Message$', 'E' AS 'MessageType$'
ELSE SELECT '' AS dummy
After item code has been entered write ' ' to quantity and press Add
Query name: BXMobileWH9_CreateGoodsReceiptPOLinesScreen_TextItem_validate_after
IF $[TextItem]<>'' SELECT '' AS TextQuantity, 'ButtonAdd' AS Click$
CreateGoodsReceiptPOQuantitiesSerialScreen
Add the following record to the Customization Fields user table:
| FieldName | Label | ReadOnly | Screen |
|---|---|---|---|
| EanCode | EAN | YES | CreateGoodsReceiptPOQuantitiesSerialScreen |
Create a new user table ‘SCANEMPBL’ with the following fields: • Employee ID (empID) • To Warehouse (ToBL)
Load bin location from employee, fill EAN bar code
Query name: BXMobileWH9_CreateGoodsReceiptPOQuantitiesSerialScreen_Load
SELECT
(SELECT [@SCANEMPBL].U_ToBL FROM [@SCANEMPBL]
WHERE U_empID = $[Employee.EmployeeID]) AS 'TextBinLocation',
(SELECT CodeBars FROM OITM
WHERE ItemCode=SUBSTRING($[TextItem],1,PATINDEX('%*%',$[TextItem])-2) ) AS 'EanCode'
Save bin location to employee
Query name: BXMobileWH9_CreateGoodsReceiptPOQuantitiesSerialScreen_TextBinLocation_validate_after
IF (SELECT ISNULL([@SCANEMPBL].U_ToBL,'') FROM [@SCANEMPBL]
WHERE U_empID = $[Employee.EmployeeID]) <> $[TextBinLocation]
UPDATE [@SCANEMPBL] SET [U_ToBL]=$[TextBinLocation]
WHERE U_empID = $[Employee.EmployeeID]
After serial entry press OK to go back
Query name: BXMobileWH9_CreateGoodsReceiptPOQuantitiesSerialScreen_TextSerial_validate_after
IF $[TextSerial]<>'' SELECT 'OK' AS Click$
CreateGoodsReceiptPOQuantitiesNormalScreen
Add the following record to the Customization Fields user table:
| FieldName | Label | ReadOnly | Screen |
|---|---|---|---|
| EanCode | EAN | YES | GoodsReceiptPOQuantitiesNormalScreen |
| FieldName | Visible | Screen | |
| TextUoM | NO | GoodsReceiptPOQuantitiesNormalScreen | |
Create a new user table ‘SCANEMPBL’ with the following fields:
- Employee ID (empID)
- To Warehouse (ToBL)
Load last location for employee, EAN bar code, set quantity to 1 and focus on quantity
Query name: BXMobileWH9_CreateGoodsReceiptPOQuantitiesNormalScreen_Load
SELECT
(SELECT CodeBars FROM OITM
WHERE ItemCode=SUBSTRING($[TextItem],1,PATINDEX('%*%',$[TextItem])-2) ) AS 'EanCode',
(SELECT [@SCANEMPBL].U_ToBL FROM [@SCANEMPBL]
WHERE U_empID = $[Employee.EmployeeID]) AS 'TextBinLocation', '1' AS 'TextQuantity' ,'TextQuantity' AS Click$
Save bin location to employee
Query name: BXMobileWH9_CreateGoodsReceiptPOQuantitiesNormalScreen_TextBinLocation_validate_after
IF (SELECT ISNULL([@SCANEMPBL].U_ToBL,'') FROM [@SCANEMPBL]
WHERE U_empID = $[Employee.EmployeeID]) <> $[TextBinLocation]
UPDATE [@SCANEMPBL] SET [U_ToBL]=$[TextBinLocation]
WHERE U_empID = $[Employee.EmployeeID]
After add button press OK to go back
Query name: BXMobileWH9_CreateGoodsReceiptPOQuantitiesNormalScreen_ButtonAdd_click_after
SELECT 'OK' AS Click$
Transfer Stocks
TransferStocksScreen
Add the following record to the Customization Fields user table:
| FieldName | Visible | Screen |
|---|---|---|
| TextBatch | NO | CreateGoodsReceiptPOQuantitiesSerialScreen |
Modify the list contents: show EAN bar code instead of item code
Query name: BXMobileWH9_TransferStocksScreen_DataRepeater_InternalDataLoad
SELECT
SUBSTRING(S.splitdata,1,15)+'EAN:'+ ISNULL(C.CodeBars,'')
AS [DataRepeater.UIItemCode]
FROM dbo.SplitStringForDataRepeater($[DataRepeater.UIItemCode]) S, OITM C
WHERE C.ItemCode=SUBSTRING(S.splitdata,1,PATINDEX('%*%',S.splitdata)-2)
Focus on item field after returning to this screen
Query name: BXMobileWH9_TransferStocksScreen_Activate
SELECT 'TextItem' AS Click$
TransferStocksQuantitiesSerialScreen
Add the following record to the Customization Fields user table:
| FieldName | Label | ReadOnly | Screen |
|---|---|---|---|
| EanCode | EAN | YES | TransferStocksQuantitiesSerialScreen |
Create a new user table ‘SCANEMPBL’ with the following fields:
- Employee ID (empID)
- To Bin Location (ToBL)
Fill to location from saved, load bar code into EAN code
Query name: BXMobileWH9_TransferStocksQuantitiesSerialScreen_Load
SELECT
(SELECT [@SCANEMPBL].U_ToBL
FROM [@SCANEMPBL]
WHERE U_empID = $[Employee.EmployeeID]) AS 'TextToLocation',
(SELECT CodeBars FROM OITM
WHERE ItemCode=SUBSTRING($[TextItem],1,PATINDEX('%*%',$[TextItem])-2) ) AS 'EanCode'
Save to location for employee
Query name: BXMobileWH9_TransferStocksQuantitiesSerialScreen_TextToLocation_validate_after
IF
(SELECT ISNULL([@SCANEMPBL].U_ToBL,'')
FROM [@SCANEMPBL]
WHERE U_empID = $[Employee.EmployeeID]) <> $[TextToLocation]
UPDATE [@SCANEMPBL]
SET [U_ToBL]=$[TextToLocation] WHERE U_empID = $[Employee.EmployeeID]
After serial number entered, press OK to go back
Query name: BXMobileWH9_TransferStocksQuantitiesSerialScreen_TextSerialNumber_validate_after
IF $[TextSerialNumber]<>'' SELECT 'OK' AS Click$
TransferStocksQuantitiesNormalScreen
Add the following record to the Customization Fields user table:
| FieldName | Label | ReadOnly | Screen |
|---|---|---|---|
| EanCode | EAN | YES | TransferStocksQuantitiesNormalScreen |
| FieldName | Visible | Screen | |
| TextUoM | NO | TransferStocksQuantitiesNormalScreen | |
Create a new user table ‘SCANEMPBL’ with the following fields:
- Employee ID (empID)
- To Warehouse (ToBL)
Load EAN bar code and to location, set quantity to 1 and focus on quantity
Query name: BXMobileWH9_TransferStocksQuantitiesNormalScreen_Load
SELECT
(SELECT CodeBars
FROM OITM
WHERE ItemCode=SUBSTRING($[TextItem],1,PATINDEX('%*%',$[TextItem])-2) ) AS 'EanCode',
(SELECT [@SCANEMPBL].U_ToBL
FROM [@SCANEMPBL]
WHERE U_empID = $[Employee.EmployeeID]) AS 'TextToLocation','1' AS 'TextQuantity','TextQuantity' AS Click$
Save to location for employee
Query name: BXMobileWH9_TransferStocksQuantitiesNormalScreen_TextToLocation_validate_after
IF (SELECT ISNULL([@SCANEMPBL].U_ToBL,'')
FROM [@SCANEMPBL]
WHERE U_empID = $[Employee.EmployeeID]) <> $[TextToLocation]
UPDATE [@SCANEMPBL]
SET [U_ToBL]=$[TextToLocation]
WHERE U_empID = $[Employee.EmployeeID]
Press OK to go back after Add button
Query name: BXMobileWH9_TransferStocksQuantitiesNormalScreen_ButtonAdd_click_after
SELECT 'OK' AS Click$
Mass Transfer
TransferStocksMassScreen
Create a new user table ‘SCANEMPBL’ with the following fields:
- Employee ID (empID)
- To Bin Location (ToBL)
- From Bin Location (FromBL)
Load saved bin location from and to
Query name: BXMobileWH9_TransferStocksMassScreen_Load
SELECT
(SELECT [@SCANEMPBL].U_FromBL FROM [@SCANEMPBL]
WHERE U_empID = $[Employee.EmployeeID]) AS 'TextWHBinLocationFrom',
(SELECT [@SCANEMPBL].U_ToBL
FROM [@SCANEMPBL]
WHERE U_empID = $[Employee.EmployeeID]) AS 'TextWHBinLocationTo'
Save from bin location
Query name: BXMobileWH9_TransferStocksMassScreen_TextWHBinLocationFrom_validate_after
IF $[TextWHBinLocationFrom] <>''
AND (SELECT ISNULL([@SCANEMPBL].U_FromBL,'')
FROM [@SCANEMPBL]
WHERE U_empID = $[Employee.EmployeeID]) <> $[TextWHBinLocationFrom]
UPDATE [@SCANEMPBL]
SET [U_FromBL]=$[TextWHBinLocationFrom]
WHERE U_empID = $[Employee.EmployeeID]
Save to bin location
Query name: BXMobileWH9_TransferStocksMassScreen_TextWHBinLocationFrom_validate_after
IF $[TextWHBinLocationTo] <>''
AND (SELECT ISNULL([@SCANEMPBL].U_ToBL,'')
FROM [@SCANEMPBL]
WHERE U_empID =$[Employee.EmployeeID]) <> $[TextWHBinLocationTo]
UPDATE [@SCANEMPBL]
SET [U_ToBL]=$[TextWHBinLocationTo]
WHERE U_empID = $[Employee.EmployeeID]
Modify list contents
• [DataRepeater. UIItemCode] Item code + name
• [DataRepeater.UIOnHandQuantity] Bar code (EAN) + quantity
Query name: BXMobileWH9_TransferStocksMassScreen_DataRepeater_InternalDataLoad
-- Modify list contents
-- [DataRepeater. UIItemCode] Item code + name
-- [DataRepeater.UIOnHandQuantity] Bar code (EAN) + quantity
SELECT C.CodeBars + ' ' +SUBSTRING(S.splitdata2,1,50) AS [DataRepeater.UIOnHandQuantity]
FROM dbo.SplitStringForDataRepeater2($[DataRepeater.UIItemCode], $
[DataRepeater.UIOnHandQuantity]) S, OITM C
WHERE C.ItemCode=SUBSTRING(S.splitdata,1,PATINDEX('%*%',S.splitdata)-1)
Transfer Stock Request
TransferStockRequestLineScreen
Add the following record to the Customization Fields user table:
| FieldName | Visible | Screen |
|---|---|---|
| TextBatch | NO | TransferStockRequestLineScreen |
Modify list contents, add EAN bar code
Query name: BXMobileWH9_TransferStockRequestLineScreen_DataRepeater_InternalDataLoad
SELECT SUBSTRING(S.splitdata,7,15)+' EAN:'+ ISNULL(C.CodeBars,'') AS
[DataRepeater.UIItem]
FROM dbo.SplitStringForDataRepeater($[DataRepeater.UIItem]) S, OITM C
WHERE C.ItemCode=SUBSTRING(S.splitdata,7,PATINDEX('%*%',S.splitdata)-8)
After Item Code has been entered, set quantity to ' ' and press Add
Query name: BXMobileWH9_TransferStockRequestLineScreen_TextItem_validate_after
IF $[TextItem]<>'' SELECT '' AS TextQuantity, 'ButtonAdd' AS Click$
Item code scanning is mandatory (before pressing Add button)
Query name: BXMobileWH9_TransferStockRequestLineScreen_ButtonAdd_click
IF $[TextItem] =''
SELECT 'You must scan an item!' AS 'Message$', 'E' AS 'MessageType$', 'TextItem'
AS Click$
Item code scanning is mandatory (before pressing Update button)
Query name: BXMobileWH9_TransferStockRequestLineScreen_ButtonUpdate_click
IF $[TextItem] =''
SELECT 'You must scan an item!' AS 'Message$', 'E' AS 'MessageType$', 'TextItem'
AS Click$
Focus on Item field (when returning to this screen)
Query name: BXMobileWH9_TransferStockRequestLineScreen_Activate
SELECT 'TextItem' AS Click$
4.1.5.2. TransferStockRequestsQuantitiesSerialScreen
Add the following record to the Customization Fields user table:
| FieldName | Label | ReadOnly | Screen |
|---|---|---|---|
| EanCode | EAN | YES | TransferStockRequestsQuantitiesSerialScreen |
Create a new user table ‘SCANEMPBL’ with the following fields:
- Employee ID (empID)
- To Bin Location (ToBL)
Set to location from saved, set EAN code from barcode
Query name: BXMobileWH9_TransferStockRequestsQuantitiesSerialScreen_Load
SELECT
(SELECT [@SCANEMPBL].U_ToBL FROM [@SCANEMPBL]
WHERE U_empID = $[Employee.EmployeeID]) AS 'TextToLocation',
(SELECT CodeBars FROM OITM
WHERE ItemCode=SUBSTRING($[TextItem],1,PATINDEX('%*%',$[TextItem])-2) ) AS 'EanCode'
Save to location if changed
Query name: BXMobileWH9_TransferStockRequestsQuantitiesSerialScreen_TextToLocation_validate_after
IF (SELECT ISNULL([@SCANEMPBL].U_ToBL,'')
FROM [@SCANEMPBL]
WHERE U_empID = $[Employee.EmployeeID])<> $[TextToLocation]
UPDATE [@SCANEMPBL]
SET [U_ToBL]=$[TextToLocation] WHERE U_empID = $[Employee.EmployeeID]
After serial number has been entered press OK to go back
Query name: BXMobileWH9_TransferStockRequestsQuantitiesSerialScreen_TextSerialNumber_validate_after
IF $[TextSerialNumber]<>'' SELECT 'OK' AS Click$
TransferStockRequestsQuantitiesNormalScreen
Add Customization Fields user table records:
| FieldName | Label | ReadOnly | Screen |
|---|---|---|---|
| EanCode | EAN | YES | TransferStockRequestsQuantitiesNormalScreen |
| FieldName | Visible | Screen | |
| TextUoM | NO | TransferStockRequestsQuantitiesNormalScreen | |
Create a new user table ‘SCANEMPBL’ with the following fields:
- Employee ID (empID)
- To Bin Location (ToBL)
- From Bin Location (FromBL)
Fill EanCode, To location, set 1 to quantity and focus on quantity
Query name: BXMobileWH9_TransferStockRequestsQuantitiesNormalScreen_Load
SELECT
(SELECT CodeBars FROM OITM
WHERE ItemCode=SUBSTRING($[TextItem],1,PATINDEX('%*%',$[TextItem])-2) ) AS 'EanCode',
(SELECT [@SCANEMPBL].U_ToBL
FROM [@SCANEMPBL]
WHERE U_empID = $[Employee.EmployeeID]) AS 'TextToLocation', '1' AS 'TextQuantity' ,'TextQuantity' AS Click$
Save to bin location for next time
Query name: BXMobileWH9_TransferStockRequestsQuantitiesNormalScreen_TextToLocation_validate_after
IF (SELECT ISNULL[@SCANEMPBL] (.U_ToBL,'')
FROM [@SCANEMPBL]
WHERE U_empID = $[Employee.EmployeeID]) <> $[TextToLocation]
UPDATE [@SCANEMPBL]
SET [U_ToBL]=$[TextToLocation]
WHERE U_empID = $[Employee.EmployeeID]
After Add press OK to go back
Query name: BXMobileWH9_TransferStockRequestsQuantitiesNormalScreen_ButtonAdd_click_after
SELECT 'OK' AS Click$
Picking Screen
Picking Screen
Add the following record to the Customization Fields user table:
| FieldName | Label | ReadOnly | Screen |
|---|---|---|---|
| BO_U_Tour ID | TourID | YES | PickingLinesScreen |
Show TourID in the list in the place of date field
Query name: BXMobileWH9_PickingScreen_DataRepeater_InternalDataLoad
SELECT SUBSTRING(S.splitdata2,1,50)+ ' Tour: ' + C.U_TourID AS [DataRepeater.UIPickDate]
FROM dbo.SplitStringForDataRepeater2($[DataRepeater.UIPickListNo], $[DataRepeater.UIPickDate]) S, OPKL C
WHERE C.AbsEntry= CAST(SUBSTRING(S.splitdata, 11,5) AS INT)
Picking Lines Screen
Add the following record to the Customization Fields user table. The Tour ID field will be shown on the screen and the Bin Code field will be editable.
| FieldName | Label | ReadOnly | Screen |
|---|---|---|---|
| BO_U_ TourID | TourID | YES | PickingLinesScreen |
| TextBinCode | Item | NO | PickingLinesScreen |
Fill TourID field on top of the screen
Query name: BXMobileWH9_PickingLinesScreen_Load
SELECT
(SELECT OPKL.U_TourID FROM OPKL WHERE OPKL.AbsEntry = CAST(LEFT($[TextPickList],PATINDEX('%*%',$[TextPickList])-1) AS INT)) AS [BO_U_TourID]
Mandatory to scan/enter item in bin code field
Query name: BXMobileWH9_PickingLinesScreen_OK_clicked
IF $[TextBinCode] =''
SELECT 'Scan an item!' AS 'Message$', 'E' AS 'MessageType$', 'TextBinCode' AS Click$
Show EAN bar code in list
Query name: BXMobileWH9_PickingLinesScreen_DataRepeater_InternalDataLoad
SELECT ' EAN: ' + C.CodeBars AS [DataRepeater.UIBinCode]
FROM dbo.SplitStringForDataRepeater2($[DataRepeater.UIItem], $[DataRepeater.UIBaseType]) S, OITM C
WHERE C.ItemCode=SUBSTRING(S.splitdata,1,PATINDEX('%*%',S.splitdata)-1)
Focus on bin code field
Query name: BXMobileWH9_PickingLinesScreen_Activate
SELECT 'TextBinCode' AS Click$
PickingLinesPickSerialScreen
Add new EanCode field to screen, set bin field to read only. Add the following records to the Customization Fields user table:
| FieldName | Label | ReadOnly | Screen |
|---|---|---|---|
| EanCode | EAN | YES | PickingLinesPickSerialScreenw |
| FieldName | Label | Screen | |
| TextBinLocation | YES | PickingLinesPickSerialScreen | |
Show the bin location and the EAN code of the item on the screen
Query name: BXMobileWH9_PickingLinesPickSerialScreen_Load
SELECT $[TextRecBin] AS 'TextBinLocation',
(SELECT CodeBars FROM OITM
WHERE ItemCode=SUBSTRING($[TextItem],1,PATINDEX('%*%',$[TextItem])-2) ) AS 'EanCode'
Press the Post button after the serial number is scanned if the open quantity is zero
Query name: BXMobileWH9_PickingLinesPickSerialScreen_TextSerialNumber_validate_after
IF $[TextSerialNumber]<>''
IF CAST(LEFT($[TextOpenQty],PATINDEX('% %',$[TextOpenQty]+' ')-1) AS INT)=0
SELECT 'OK' AS 'Click$'
ELSE SELECT 'OK##Option' AS 'Click$'
PickingLinesPickNormalScreen
Hide UoM field from screen. Add the following record to the Customization Fields user table:
| FieldName | Label | ReadOnly | Screen |
|---|---|---|---|
| EanCode | EAN | YES | PickingLinesPickNormalScreen |
| FieldName | Visible | Screen | |
| TextUoM | NO | PickingLinesPickNormalScreen | |
| FieldName | ReadOnly | Screen | |
| TextBinLocation | YES | PickingLinesPickNormalScreen | |
Show the bin location and the EAN code of the item on the screen
Query name: BXMobileWH9_PickingLinesPickNormalScreen_Load
SELECT $[TextRecBin] AS 'TextBinLocation',
(SELECT CodeBars FROM OITM
WHERE ItemCode=$[SelectedPickListLine.ItemCode]) AS 'EanCode',1 AS 'TextQuantity', 'TextQuantity' AS Click$
After quantity has been entered, press OK to book and then back button
Query name: BXMobileWH9_PickingLinesPickNormalScreen_TextQuantity_validate_after
IF CAST(LEFT($[TextOpenQty],PATINDEX('% %',$[TextOpenQty]+' ')-1) AS INT)-CAST($[TextQuantity] AS INT)<=0
SELECT 'OK' AS 'Click$'
ELSE SELECT 'OK##Option' AS 'Click$'
Goods Receipt
GoodsReceiptLinesScreen
Hide UoM field from screen. Add the following record to the Customization Fields user table:
| FieldName | Visible | Screen |
|---|---|---|
| TextUoM | NO | PickingLinesScreen |
Sets price, currency and account no fields
Query name: bx_mobile_wh9_goodsreceipt_pricing
SELECT
	ISNULL(T1.Price,0) AS 'BXITPRC',
	ISNULL(T1.Currency,'FT') AS 'BXITCURR',
	'5911' AS 'BXITACCN'
FROM OITM T0
JOIN ITM1 T1 ON T0.ItemCode=T1.ItemCode AND T1.Pricelist='1'
WHERE T0.[ItemCode] =[%3]
Create a new user table ‘SCANEMPWH’ with the following fields:
- Employee ID (empID)
- To Warehouse (ToWh)
Load warehouse from employee's saved value, focus on item
Query Name: BXMobileWH9_GoodsReceiptLinesScreen_Load
SELECT
(SELECT [@SCANEMPWH].U_ToWh FROM [@SCANEMPWH]
WHERE U_empID =$[Employee.EmployeeID]) AS 'TextWarehouse', 'TextItem' AS Click$
Save warehouse code for next time
Query Name: Save warehouse code for next time
IF (SELECT ISNULL([@SCANEMPWH].U_ToWh,'') FROM [@SCANEMPWH]
WHERE U_empID = $[Employee.EmployeeID]) <> $[TextWarehouse]
UPDATE [@SCANEMPWH] SET [U_ToWh]=$[TextWarehouse] WHERE U_empID = $[Employee.EmployeeID]
After item code has been entered, automatically set quantity to ' ' and press add
Query Name: BXMobileWH9_GoodsReceiptLinesScreen_TextItem_validate_after
IF $[TextItem]<>'' SELECT '' AS TextQuantity, 'ButtonAdd' AS Click$
Change the contents of the list: [DataRepeater.UIItem] Item code + name, [DataRepeater.UIWarehouse] Bar code (EAN)
Query Name: BXMobileWH9_GoodsReceiptLinesScreen_DataRepeater_InternalDataLoad
SELECT
	SUBSTRING(S.splitdata,7,50) AS [DataRepeater.UIItem],
	C.CodeBars AS [DataRepeater.UIWarehouse]
FROM dbo.SplitStringForDataRepeater($[DataRepeater.UIItem]) S, OITM C
WHERE C.ItemCode=SUBSTRING(S.splitdata,7,PATINDEX('%*%',S.splitdata)-8)
Focus on item code (on return to this screen)
Query Name: BXMobileWH9_GoodsReceiptLinesScreen_Activate
SELECT 'TextItem' AS Click$
Query Stocks
QueryStocksScreen
Hide batch field from screen. Add the following record to the Customization Fields user table:
| FieldName | Visible | Screen |
|---|---|---|
| TextBatch | NO | QueryStocksScreen |
Create a new user table ‘SCANEMPWH’ with the following fields:
- Employee ID (empID)
- To Warehouse (ToWh)
Load default warehouse for employee, focus on Item field
Query Name: BXMobileWH9_QueryStocksScreen_Load
SELECT
(SELECT [@SCANEMPWH].U_ToWh FROM [@SCANEMPWH] WHERE U_empID = $[Employee.EmployeeID]) AS 'TextWHBinLocation', 'TextItem' AS Click$
Modify list contents (show bar code)
Query Name: BXMobileWH9_QueryStocksScreen_DataRepeater_InternalDataLoad
SELECT SUBSTRING(S.splitdata,1,50) +' VK: '+ C.CodeBars AS [DataRepeater.UIItemCode]
FROM dbo.SplitStringForDataRepeater($[DataRepeater.UIItemCode]) S, OITM C
WHERE C.ItemCode=SUBSTRING(S.splitdata,1,PATINDEX('%*%',S.splitdata)-1)
Appendix
Helper SQL procedures
-- This function is a helper for Produmex Scan list splitting
CREATE FUNCTION [dbo].[SplitStringForDataRepeater]
( @string NVARCHAR(MAX) )
RETURNS @output TABLE(splitdata NVARCHAR(MAX) )
BEGIN
DECLARE @START INT, @END INT
SELECT @START = 1, @END = CHARINDEX('##', @string)
WHILE @START < LEN(@string) + 1 BEGIN
IF @END = 0
SET @END = LEN(@string) + 2
INSERT INTO @output (splitdata)
VALUES(SUBSTRING(@string, @START, @END - @START))
SET @START = @END + 2
SET @END = CHARINDEX('##', @string, @START)
END
RETURN
END
-- This function is a helper for Produmex Scan list splitting
CREATE FUNCTION [dbo].[SplitStringForDataRepeater2]
( @string NVARCHAR(MAX), @string2 NVARCHAR(MAX) )
RETURNS @output TABLE(splitdata NVARCHAR(MAX) , splitdata2 NVARCHAR(MAX))
BEGIN
DECLARE @START INT, @END INT , @start2 INT, @end2 INT
SELECT @START = 1, @END = CHARINDEX('##', @string) , @start2 = 1, @end2 =
CHARINDEX('##', @string2)
WHILE @START < LEN(@string) + 1 BEGIN
IF @END = 0
BEGIN
SET @END = LEN(@string) + 2
SET @end2 = LEN(@string2) + 2
END
INSERT INTO @output (splitdata, splitdata2)
VALUES(SUBSTRING(@string, @START, @END - @START),SUBSTRING(@string2,
@start2, @end2 - @start2))
SET @START = @END + 2
SET @END = CHARINDEX('##', @string, @START)
SET @start2 = @end2 + 2
SET @end2 = CHARINDEX('##', @string2, @start2)
END
RETURN
END
Strategies in Produmex Scan
This documentation describes the steps of configuring and customizing the incoming and replenishment strategies in Produmex Scan.
Incoming Strategy
The incoming strategy is a user query that is run periodically by the Produmex Scan server component. The output of the query creates Stock Transfer Draft documents if stock move is required.
Limitations:
The Stock Transfer Draft document is not created in the following cases:
- The item is managed by serial numbers, the management method is On Release Only and the serial number is not provided.
- The item is managed by batch numbers or serial numbers and on the Item Master Data window the Issue Primarily By setting is set to Bin Locations.
Configuration
Settings
Configure the following setting on the Produmex Scan Strategies tab.
Incoming strategies UQ name (default: bxmobilewh9_strategy_incoming)
Incoming strategies frequency (default: 300 seconds = 5 minutes)
Query input, output
By default, the user query must be named 'bxmobilewh9_strategy_incoming', but this can be changed in the configuration.
Input: the user query takes no input
Output: the user query must return a table with the recommended movement results.
The result table columns are:
- ItemCode
- BatchNumber (only applicable for batch items, otherwise leave empty)
- SerialNumber (only applicable for serial items, otherwise leave empty)
- Quantity (in inventory UoM)
- SourceLocation (where to move from)
- DestinationLocation (where to move to)
- GroupID
- Remarks
The GroupID result column can be used to group created output documents: for each different groupID, a different Stock Transfer - Draft document will be created.
Logging, monitoring
Mobile interface
Incoming strategy recommendation results transfers can be accessed from the Produmex Scan main menu, with the 'Incoming Recommendations' icon.

On the incoming recommendations screen, you will see all the Stock Transfer - Draft documents, where the Transaction Type user-defined field is 'Incoming'. It is possible to filter by 'From Warehouse' or 'To Warehouse'.
After selecting the appropriate document, press the Transfer button to start working on it.

Example incoming strategy

In this example, we have an incoming location (01-R-1-1-1) where incoming trucks unload the goods. Our incoming strategy will check if there is any stock on this location, and automatically recommend moving it to empty locations in the warehouse shelves (locations 01-A-1-*-*).
The algorithm which is implemented in an SQL user query:
- Check if incoming locations (01-R-1-1-1) have stock
- Look at the stock, see if it has a recommendation already
- If not, then find a locations to move to – the next empty location in 01-A-1-*-*. Order of looking for empty locations is by shelf column then level (see figure below).
- Return results to create recommendations for moving the incoming the item


In this example scenario on the picture above, the algorithm will return the following recommendations:
| Item | Batch | From bin | To bin | Quantity |
|---|---|---|---|---|
| A1000 | 01-R-1-1-1 | 01-A-1-1-2 | 1 (pallet)* | |
| A1000 | 01-R-1-1-1 | 01-A-1-1-3 | 1 (pallet)* | |
| B1001 | B12345 | 01-R-1-1-1 | 01-A-1-2-3 |
*Quantity is always in inventory units, pallet units are only for illustration purposes here.
Replenishment Strategy
Configuration
Settings
Configure the following setting on the Produmex Scan Strategies tab.
Replenishment strategies UQ name (default: bxmobilewh9_strategy_replenishment)
Replenishment strategies frequency (default: 300 seconds = 5 minutes)
Query input, output
By default, the user query must be named 'bxmobilewh9_strategy_replenishment', but this can be changed in the configuration.
Input: the user query takes no input
Output: the user query must return a table with the recommended movement results.
The result table columns are:
- ItemCode
- BatchNumber (only applicable for batch items, otherwise leave empty)
- SerialNumber (only applicable for serial items, otherwise leave empty)
- Quantity (in inventory UoM)
- SourceLocation (where to move from)
- DestinationLocation (where to move to)
- GroupID
- Remarks
The GroupID result column can be used to group created output documents: for each different groupID, a different Stock Transfer Draft document will be created.
Logging, monitoring
Mobile interface
See the section 'Incoming Strategy – Mobile interface'. The work flow is the same, but you have to select the 'Replenishment recommendations' icon on the main screen.
Example replenishment strategy

Replenishment strategy can be used to refill easily-reached locations in a warehouse system. In this example warehouse, the locations on the first level (01-A-1-*-1) are reachable by every warehouse worker, but higher levels (01-A-1-*-2, 3) are only reachable by fork lifts.
The refill algorithm, which is implemented in SQL query:
- Check first level locations (01-A-1-*-1), see if it's empty or it's below minimum level (25% of pallet).
- Look for refill sources in the same column, but higher levels. If found, recommend moving items from upper levels to lower levels


In this example scenario on the picture above, the algorithm will return the following recommendations:
| Item | Batch | From bin | To bin | Quantity |
|---|---|---|---|---|
| A1000 | 01-A-1-1-3 | 01-A-1-1-2 | 1 (pallet)* | |
| A2000 | 01-A-1-2-3 | 01-A-1-1-3 | 0.8 (pallet)* | |
| B1001 | B12345 | 01-A-1-3-3 | 01-A-1-2-3 | 1 (pallet)* |
*Quantity is always in inventory units, pallet units are only for illustration purposes here.
Appendix
Helper view
MS SQL version
CREATE VIEW XXX_INVTRANSFER_DRAFT_LINESBIN
AS
SELECT DRF1.DocEntry, DRF1.ItemCode, DRF1.LineNum, fromBin.BinCode AS FromBin,
fromBinLine.Quantity AS FromQuantity,
toBin.BinCode AS ToBin,
toBinLine.Quantity AS ToQuantity
FROM ODRF, DRF1
LEFT OUTER JOIN DRF19 fromBinLine ON (fromBinLine.ObjType = 67
AND fromBinLine.DocEntry = DRF1.DocEntry
AND fromBinLine.LineNum = DRF1.LineNum
AND fromBinLine.BinActTyp = 2)
LEFT OUTER JOIN DRF19 toBinLine ON (toBinLine.ObjType = 67
AND toBinLine.DocEntry = DRF1.DocEntry
AND toBinLine.LineNum = DRF1.LineNum
AND toBinLine.BinActTyp = 1)
LEFT OUTER JOIN OBIN fromBin ON (fromBin.AbsEntry = fromBinLine.BinAbs)
LEFT OUTER JOIN OBIN toBin ON (toBin.AbsEntry = toBinLine.BinAbs)
WHERE ODRF.ObjType = 67
AND DRF1.ObjType = 67
AND toBinLine.ObjType = 67
AND ODRF.DocEntry = DRF1.DocEntry
HANA version
CREATE VIEW "PMXSCAN19_2"."XXX_INVTRANSFER_DRAFT_LINESBIN" ( "DocEntry",
	 "ItemCode",
	 "LineNum",
	 "fromBin",
	 "FromQuantity",
	 "ToBin",
	 "ToQuantity" ) AS SELECT
	 "DRF1"."DocEntry",
	 "DRF1"."ItemCode",
	 "DRF1"."LineNum",
	 "fromBin"."BinCode" AS "fromBin",
	 "fromBinLine"."Quantity" AS "FromQuantity",
	 "toBin"."BinCode" AS "ToBin",
	 "toBinLine"."Quantity" AS "ToQuantity"
FROM "ODRF",
	 "DRF1"
LEFT OUTER JOIN "DRF19" AS "fromBinLine" ON ("fromBinLine"."ObjType" = 67
	AND "fromBinLine"."DocEntry" = "DRF1"."DocEntry"
	AND "fromBinLine"."LineNum" = "DRF1"."LineNum"
	AND "fromBinLine"."BinActTyp" = 2)
LEFT OUTER JOIN "DRF19" AS "toBinLine" ON ("toBinLine"."ObjType" = 67
	AND "toBinLine"."DocEntry" = "DRF1"."DocEntry"
	AND "toBinLine"."LineNum" = "DRF1"."LineNum"
	AND "toBinLine"."BinActTyp" = 1)
LEFT OUTER JOIN "OBIN" "fromBin" ON ("fromBin"."AbsEntry" = "fromBinLine"."BinAbs")
LEFT OUTER JOIN "OBIN" "toBin" ON ("toBin"."AbsEntry" = "toBinLine"."BinAbs")
WHERE "ODRF"."ObjType" = 67
AND "DRF1"."ObjType" = 67
AND "toBinLine"."ObjType" = 67
AND "ODRF"."DocEntry" = "DRF1"."DocEntry" WITH READ ONLY
Example Incoming Strategy
Algorithm:
- Look for stock on RecBinLocation (eg. 01-Q), only non-serial, non-batch items
- Subtract/ignore stock quantity already recommended for moving
- Recommend moving remaining quantity to locations defined by OutLocationFilter eg. 01-F-%, look for empty locations. Only put one PurchaseUoM (eg. pallet) quantity on one out location, split moving to multiple out locations if needed.
Example Incoming Strategy SQL
DECLARE @RecBinLocation nvarchar(MAX)
DECLARE @OutLocationFilter nvarchar(MAX)
DECLARE @ItemCode nvarchar(MAX)
DECLARE @Quantity DECIMAL
DECLARE @SourceLocation nvarchar(MAX)
DECLARE @DestinationLocation nvarchar(MAX)
DECLARE @PurchaseUomQuantity nvarchar(MAX)
DECLARE @QuantityPartial DECIMAL
DECLARE @ExcludeBinList nvarchar(MAX)
DECLARE @QuantityAlready DECIMAL

/*
@RecBinLocation: receiving bin location
@OutLocationFilter: target bin location filter
*/
SET @RecBinLocation = '01-S'
SET @OutLocationFilter = '01-%'
SET @ExcludeBinList = ''

-- temp table for moving
DECLARE @RESULT TABLE (
       ItemCode nvarchar(MAX),
       BatchNumber nvarchar(MAX),
       SerialNumber nvarchar(MAX),
       Quantity DECIMAL,
       SourceLocation nvarchar(MAX),
       DestinationLocation nvarchar(MAX),
       GroupID nvarchar(MAX),
       Remarks nvarchar(MAX)
)

-- select stock on the receiving bin location
DECLARE curs CURSOR FOR
SELECT OIBQ.ItemCode, OIBQ.OnHandQty, OBIN.BinCode
FROM OBIN, OIBQ, OITM
WHERE OBIN.BinCode = @RecBinLocation
       AND OIBQ.BinAbs = OBIN.AbsEntry
       AND OITM.ItemCode = OIBQ.ItemCode
       AND OIBQ.OnHandQty > 0
       AND OITM.ManBtchNum ='N'
       AND OITM.ManSerNum = 'N'

-- cursor for checkin items one by one
OPEN curs
FETCH NEXT FROM curs INTO @ItemCode, @Quantity, @SourceLocation
WHILE @@FETCH_STATUS = 0
BEGIN
       SET @PurchaseUomQuantity = NULL
       SELECT @PurchaseUomQuantity = BaseQty
       FROM UGP1, OITM
       WHERE UGP1.UgpEntry = OITM.UgpEntry AND UGP1.UomEntry = OITM.PUomEntry AND OITM.ItemCode = @ItemCode

       -- check the quantity that has already been added on a previous stock transfer draft document
       SET @QuantityAlready = NULL
       SELECT @QuantityAlready = SUM(FromQuantity)
       FROM XXX_INVTRANSFER_DRAFT_LINESBIN
       WHERE ItemCode = @ItemCode AND FromBin = @SourceLocation


       IF @QuantityAlready IS NOT NULL BEGIN SET @Quantity = @Quantity - @QuantityAlready END

       WHILE @Quantity > 0 BEGIN
              SET @QuantityPartial = @Quantity
              IF @PurchaseUomQuantity IS NOT NULL AND @QuantityPartial > @PurchaseUomQuantity BEGIN
                     SET @QuantityPartial = @PurchaseUomQuantity
              END

              -- make some logic to get the target bin location
              SET @DestinationLocation = NULL
              SELECT TOP 1 @DestinationLocation = BinCode
                     FROM OBIN LEFT OUTER JOIN OIBQ ON (OBIN.AbsEntry = OIBQ.AbsEntry)
                     WHERE OBIN.BinCode LIKE @OutLocationFilter
                           AND charindex(OBIN.BinCode, @ExcludeBinList) <= 0
                           AND OBIN.BinCode NOT IN
                           (SELECT ToBin FROM XXX_INVTRANSFER_DRAFT_LINESBIN
                                  WHERE ToBin LIKE @OutLocationFilter)
                                  GROUP BY BinCode HAVING SUM(OnHandQty) = 0 OR SUM(OnHandQty) IS NULL
              ORDER BY BinCode

              -- if no more places, DestinationLocation will be empty
              INSERT INTO @RESULT (ItemCode, Quantity, SourceLocation, DestinationLocation)
              VALUES (@ItemCode, @QuantityPartial, @SourceLocation, @DestinationLocation)

SET @Quantity = @Quantity - @QuantityPartial
SET @ExcludeBinList = @ExcludeBinList + ' ' + @DestinationLocation
END
FETCH NEXT FROM curs INTO @ItemCode, @Quantity, @SourceLocation
END
CLOSE curs
DEALLOCATE curs
SELECT * FROM @RESULT
Example Incoming Strategy HANA
CREATE PROCEDURE PMXSCAN_PMXSCAN_INCOMINGSTRATEGY (
)
LANGUAGE SQLSCRIPT
AS
BEGIN
	DECLARE RecBinLocation NVARCHAR(200);
	DECLARE OutLocationFilter NVARCHAR(200);
	DECLARE ItemCode NVARCHAR(200);
	DECLARE Quantity DECIMAL(21,6);
	DECLARE SourceLocation NVARCHAR(200);
	DECLARE DestinationLocation NVARCHAR(200);
	DECLARE PurchaseUomQuantity NVARCHAR(200);
	DECLARE QuantityPartial DECIMAL(21,6);
	DECLARE ExcludeBinList NVARCHAR(2000);
	DECLARE BatchNum NVARCHAR(200);
	DECLARE QuantityAlready NVARCHAR(200);
	DECLARE TableExists INT;

	DECLARE CURSOR curs FOR
		SELECT "OIBQ"."ItemCode", "OIBQ"."OnHandQty", "OBIN"."BinCode" FROM "OBIN", "OIBQ", "OITM"
		WHERE "OBIN"."BinCode" = RecBinLocation AND "OIBQ"."BinAbs" = "OBIN"."AbsEntry" AND
			"OITM"."ItemCode" = "OIBQ"."ItemCode" AND "OIBQ"."OnHandQty" > 0
			AND "OITM"."ManBtchNum" ='N' AND "OITM"."ManSerNum" = 'N';
	/*
	SELECT COUNT(*) INTO TableExists FROM "PUBLIC"."M_TEMPORARY_TABLES" WHERE "TABLE_NAME" = '#RESULT';
	IF TableExists > 0 THEN
		DROP TABLE #result;
	END IF;
	*/
	CREATE LOCAL TEMPORARY TABLE #result
	(
		"ItemCode" NVARCHAR(200),
		"BatchNumber" NVARCHAR(200),
		"SerialNumber" NVARCHAR(200),
		"Quantity" DECIMAL(21,6),
		"SourceLocation" NVARCHAR(200),
		"DestinationLocation" NVARCHAR(200),
		"GroupID" NVARCHAR(200),
		"Remarks" NVARCHAR(200)
	);

	RecBinLocation := '01-S';
	OutLocationFilter := '01-F%';
	ExcludeBinList := '01-SYSTEM-BIN-LOCATION';

	FOR c_ as curs DO
		ItemCode := c_."ItemCode";
		Quantity := c_."OnHandQty";
		SourceLocation := c_."BinCode";

		PurchaseUomQuantity := NULL;
		SELECT SUM("BaseQty") into PurchaseUomQuantity FROM "UGP1", "OITM"
			WHERE "UGP1"."UgpEntry" = "OITM"."UgpEntry" AND "UGP1"."UomEntry" = "OITM"."PUoMEntry" AND "OITM"."ItemCode" = ItemCode;

		QuantityAlready := NULL;
		SELECT SUM("FromQuantity") into QuantityAlready FROM "XXX_INVTRANSFER_DRAFT_LINESBIN"
			WHERE "ItemCode" = ItemCode AND "FromBin" = SourceLocation;

		IF QuantityAlready IS NOT NULL THEN
			Quantity := Quantity - QuantityAlready;
		END IF;

		WHILE Quantity > 0 DO
			QuantityPartial := Quantity;

			IF PurchaseUomQuantity IS NOT NULL AND QuantityPartial > PurchaseUomQuantity THEN
				QuantityPartial := PurchaseUomQuantity;
			END IF;

			DestinationLocation := NULL;

			SELECT TOP 1 "BinCode" into DestinationLocation
				FROM "OBIN" LEFT OUTER JOIN "OIBQ" ON ("OBIN"."AbsEntry" = "OIBQ"."BinAbs")
				WHERE "OBIN"."BinCode" LIKE OutLocationFilter
				AND LOCATE(ExcludeBinList, "OBIN"."BinCode") <= 0
				AND "OBIN"."BinCode" NOT IN (SELECT "ToBin" FROM "XXX_INVTRANSFER_DRAFT_LINESBIN"
				WHERE "ToBin" LIKE OutLocationFilter)
				GROUP BY "BinCode" HAVING SUM("OnHandQty") = 0 OR SUM("OnHandQty") IS NULL
				ORDER BY "BinCode";

			INSERT INTO #result VALUES (ItemCode, BatchNum, '', QuantityPartial, SourceLocation, DestinationLocation, '', '');

			Quantity := Quantity - QuantityPartial;
			ExcludeBinList := ExcludeBinList || ' ' || DestinationLocation;
		END WHILE;
	END FOR;

	SELECT * FROM #result;
	DROP TABLE #result;
END;


call "BXINCOMINGSTRATEGY"()
Example Replenishment Strategy
Algorithm:
- See what stocks are on floor (*-1) locations and on upper (*-2. *-3, ec) locations for the same itemcode. (Only normal items are considered, and which have purchase uom groups defined) Only look in bin locations 01-F-* (ScanArea0)
- If floor quantity ⇐ 50% of pallet quantity, look for upper locations. Also consider Inventory Transfer Draft documents aleady recorded. Recommend moving quantities from upper locations until floor quantity reaches 100% of pallet quantity if possible.
Example Replenishment Strategy MS SQL
DECLARE @ScanArea nvarchar(MAX)
DECLARE @FloorLocation4 nvarchar(MAX)
SET @ScanArea = '01-F-%'
SET @FloorLocation4 = '1'

DECLARE @FloorBin nvarchar(MAX)
DECLARE @ItemCode nvarchar(MAX)
DECLARE @FloorQuantity DECIMAL
DECLARE @UpperBin nvarchar(MAX)
DECLARE @UpperQuantity DECIMAL
DECLARE @PalletQty DECIMAL
DECLARE @QuantityPartial DECIMAL
DECLARE @LastBin nvarchar(MAX)
DECLARE @LastBinFloorQuantity DECIMAL
DECLARE @QuantityNeeded DECIMAL
DECLARE @QuantityAlready DECIMAL
DECLARE @RESULT TABLE (
ItemCode nvarchar(MAX),
BatchNumber nvarchar(MAX),
SerialNumber nvarchar(MAX),
Quantity DECIMAL,
SourceLocation nvarchar(MAX),
DestinationLocation nvarchar(MAX),
GroupID nvarchar(MAX),
Remarks nvarchar(MAX)
)
DECLARE curs CURSOR FOR
SELECT
binupper.FloorBinCode2 AS FloorBin,
binupper.ItemCode AS ItemCode,
binfloor.OnHandQty AS FloorQuantity,
binupper.BinCode AS UpperBin,
binupper.OnHandQty AS UpperQuantity,
palletQuantities.BaseQty AS PalletQty
FROM
(
SELECT OBIN.WhsCode + '-' + OBIN.SL1Code + '-' + OBIN.SL2Code + '-' + OBIN.SL3Code
AS BinPrefix,
OBIN.WhsCode + '-' + OBIN.SL1Code + '-' + OBIN.SL2Code + '-' + OBIN.SL3Code + '-' +
@FloorLocation4 AS FloorBinCode2,
OBIN.BinCode, OIBQ.ItemCode, OIBQ.OnHandQty FROM OIBQ, OBIN WHERE OBIN.BinCode LIKE
@ScanArea AND OBIN.SL4Code <> @FloorLocation4 AND OBIN.AbsEntry = OIBQ.BinAbs
) binupper
LEFT OUTER JOIN
(
SELECT OBIN.WhsCode + '-' + OBIN.SL1Code + '-' + OBIN.SL2Code + '-' + OBIN.SL3Code
AS BinPrefix, OBIN.BinCode, OIBQ.ItemCode, OIBQ.OnHandQty
FROM OIBQ, OBIN
WHERE OBIN.BinCode LIKE @ScanArea
AND OBIN.SL4Code = @FloorLocation4
AND OBIN.AbsEntry = OIBQ.BinAbs
) binfloor ON (binfloor.ItemCode = binupper.ItemCode AND binfloor.BinPrefix =
binupper.binprefix)
JOIN (
SELECT ItemCode, BaseQty FROM UGP1, OITM WHERE UGP1.UgpEntry = OITM.UgpEntry AND
UGP1.UomEntry = OITM.PUomEntry
) palletQuantities ON (binupper.ItemCode = palletQuantities.ItemCode)
WHERE binfloor.OnHandQty IS NULL OR binfloor.OnHandQty <= palletQuantities.BaseQty
/2 AND binupper.OnHandQty > 0
ORDER BY UpperBin
SET @LastBin = ''
SET @LastBinFloorQuantity = 0
OPEN curs
FETCH NEXT FROM curs INTO @FloorBin, @ItemCode, @FloorQuantity, @UpperBin, @UpperQuantity, @PalletQty
WHILE @@FETCH_STATUS = 0
BEGIN
IF @FloorQuantity IS NULL BEGIN SET @FloorQuantity = 0 END
IF @LastBin <> @FloorBin BEGIN
SET @LastBin = @FloorBin
SET @QuantityAlready = NULL
SELECT @QuantityAlready = SUM(ToQuantity) FROM
XXX_INVTRANSFER_DRAFT_LINESBIN WHERE ItemCode = @ItemCode AND ToBin = @FloorBin
IF @QuantityAlready IS NULL BEGIN SET @QuantityAlready = 0 END
SET @LastBinFloorQuantity = @FloorQuantity + @QuantityAlready
END
IF @LastBinFloorQuantity <= @PalletQty / 2 BEGIN
SET @QuantityNeeded = @PalletQty - @LastBinFloorQuantity
SET @QuantityPartial = @QuantityNeeded
IF @QuantityPartial > @UpperQuantity BEGIN SET @QuantityPartial = @UpperQuantity END
SET @LastBinFloorQuantity = @LastBinFloorQuantity + @QuantityPartial
INSERT INTO @RESULT (ItemCode, Quantity, SourceLocation, DestinationLocation)
VALUES (@ItemCode, @QuantityPartial, @UpperBin, @FloorBin)
END
FETCH NEXT FROM curs INTO @FloorBin, @ItemCode, @FloorQuantity, @UpperBin, @UpperQuantity, @PalletQty
END
CLOSE curs
DEALLOCATE curs
SELECT * FROM @RESULT
If you are NOT getting the expected Replenishment Strategy results, then it is recommend to check on the Master Data Configuration, the Bin Restrictions settings and make sure the Batch is released.
1. Check on your Item Master Data settings:

2. Review possible Bin Restrictions:

3. Make sure the status of the batch is released:

Example Replenishment Strategy HANA
The scan area and the floor location can be set in the calling of the procedure:
CALL “PMXSCAN_REPLENISHMENT” ( '01-F-%', '1' ) ;
CREATE PROCEDURE PMXSCAN_REPLENISHMENT (
    IN
    ScanArea NVARCHAR(5000),
    FloorLocation4 NVARCHAR(5000)
)
LANGUAGE SQLSCRIPT
AS
BEGIN
	DECLARE FloorBin nvarchar(5000);
	DECLARE ItemCode nvarchar(5000);
	DECLARE FloorQuantity DECIMAL;
	DECLARE UpperBin nvarchar(5000);
	DECLARE UpperQuantity DECIMAL;
	DECLARE PalletQty DECIMAL;
	DECLARE QuantityPartial DECIMAL;
	DECLARE LastBin nvarchar(5000);
	DECLARE LastBinFloorQuantity DECIMAL;
	DECLARE QuantityNeeded DECIMAL;
	DECLARE QuantityAlready DECIMAL;
	DECLARE CURSOR curs FOR
	SELECT
		"binupper"."FloorBinCode2" AS "FloorBin",
		"binupper"."ItemCode" AS "ItemCode",
		"binfloor"."OnHandQty" AS "FloorQuantity",
		"binupper"."BinCode" AS "UpperBin",
		"binupper"."OnHandQty" AS "UpperQuantity",
		"palletQuantities"."BaseQty" AS "PalletQty"
	FROM
		(
		SELECT
			"OBIN"."WhsCode" || '-' || "OBIN"."SL1Code" || '-' || "OBIN"."SL2Code" || '-' || "OBIN"."SL3Code" AS "BinPrefix",
			"OBIN"."WhsCode" || '-' || "OBIN"."SL1Code" || '-' || "OBIN"."SL2Code" || '-' || "OBIN"."SL3Code" || '-' || FloorLocation4 AS "FloorBinCode2",
			"OBIN"."BinCode", "OIBQ"."ItemCode", "OIBQ"."OnHandQty"
		FROM "OIBQ", "OBIN"
		WHERE "OBIN"."BinCode" LIKE ScanArea AND "OBIN"."SL4Code" <> FloorLocation4 AND "OBIN"."AbsEntry" = "OIBQ"."BinAbs"
		) "binupper"
		LEFT OUTER JOIN
		(
		SELECT
			"OBIN"."WhsCode" || '-' || "OBIN"."SL1Code" || '-' || "OBIN"."SL2Code" || '-' || "OBIN"."SL3Code" AS "BinPrefix",
			"OBIN"."BinCode", "OIBQ"."ItemCode", "OIBQ"."OnHandQty"
		FROM "OIBQ", "OBIN"
		WHERE "OBIN"."BinCode" LIKE ScanArea
			AND "OBIN"."SL4Code" = FloorLocation4
			AND "OBIN"."AbsEntry" = "OIBQ"."BinAbs"
		) "binfloor"
		ON ("binfloor"."ItemCode" = "binupper"."ItemCode" AND "binfloor"."BinPrefix" = "binupper"."BinPrefix")
		JOIN (
		SELECT "ItemCode", "BaseQty" FROM "UGP1", "OITM" WHERE "UGP1"."UgpEntry" = "OITM"."UgpEntry"
		/*AND "UGP1"."UomEntry" = "OITM"."PUomEntry"*/
		) "palletQuantities"
		ON ("binupper"."ItemCode" = "palletQuantities"."ItemCode")
	WHERE
		"binfloor"."OnHandQty" IS NULL OR "binfloor"."OnHandQty" <= "palletQuantities"."BaseQty" AND "binupper"."OnHandQty" > 0
	ORDER BY "UpperBin";

	LastBin := '';
	LastBinFloorQuantity := 0;

	CREATE LOCAL TEMPORARY TABLE #result
	(
		"ItemCode" NVARCHAR(200),
		"BatchNumber" NVARCHAR(200),
		"SerialNumber" NVARCHAR(200),
		"Quantity" DECIMAL(21,6),
		"SourceLocation" NVARCHAR(200),
		"DestinationLocation" NVARCHAR(200),
		"GroupID" NVARCHAR(200),
		"Remarks" NVARCHAR(200)
	);

	FOR c_ AS curs DO
		FloorBin :=c_."FloorBin";
		ItemCode :=c_."ItemCode";
		FloorQuantity :=c_."FloorQuantity";
		UpperBin :=c_."UpperBin";
		UpperQuantity :=c_."UpperQuantity";
		PalletQty :=c_."PalletQty";


		IF FloorQuantity IS NULL THEN
			FloorQuantity := 0;
		END IF;
		IF LastBin <> FloorBin THEN
			LastBin := FloorBin;
			QuantityAlready := NULL;

			SELECT SUM("ToQuantity") INTO QuantityAlready FROM
			"XXX_INVTRANSFER_DRAFT_LINESBIN" WHERE "ItemCode" = ItemCode AND "ToBin" = FloorBin;

			IF QuantityAlready IS NULL THEN
				QuantityAlready := 0;
			END IF;
			LastBinFloorQuantity := FloorQuantity + QuantityAlready;
		END IF;
		IF LastBinFloorQuantity <= PalletQty / 2 THEN
			QuantityNeeded := PalletQty - LastBinFloorQuantity;
			QuantityPartial := QuantityNeeded;
			IF QuantityPartial > UpperQuantity THEN
				QuantityPartial := UpperQuantity;
			END IF;
			LastBinFloorQuantity := LastBinFloorQuantity + QuantityPartial;

			INSERT INTO #result ("ItemCode", "Quantity", "SourceLocation", "DestinationLocation")
			VALUES (ItemCode, QuantityPartial, UpperBin, FloorBin);
		END IF;

	END FOR;

	SELECT * FROM #result;
	DROP TABLE #result;

END;
Manipulating DataRepeater (List)
There are list boxes on the screens in which items, SAP documents, serial or batch numbers appear. In the Produmex Scan these list objects are called: DateRepeater.
In one row you can usually find multiple data. For example Itemcode, Location, Document Line Number.
The pieces of information for one type of data are stored concatenated in a single string, separated by: “##”.
There are two parameters that we have for one type of data:
- You can find the concatenated value in the parameter that starts with: DataRepeater.UI
- You can find the value from the selected row in the parameter that starts with: DataRepeater.SelectedUI
Example:
$[DataRepeater.UIWarehouse] = WH: 01##WH: 02##WH: 03
$[DataRepeater.SelectedUIWarehouse] = WH: 01
If you would like to manipulate the appearing content then you should convert the concatenated string into an SQL table with our example splitter functions shown below. This table can be used in a query in order to load the data you need.
As a final step define the column in your query. The column name should be the same as the name of the parameter that you want to replace, for example:
SELECT
	'NewInfo' as "DataRepeater.UIRemarks"
FROM
.....
You will need a splitter function, to separate data. If it does not exist, then you can create them with these queries:
SQL
CREATE FUNCTION [dbo].[SplitStringForDataRepeater]
(
    @string NVARCHAR(MAX)
)
RETURNS @output TABLE(splitdata NVARCHAR(MAX)
)
BEGIN
    DECLARE @start INT, @end INT
    SELECT @start = 1, @end = CHARINDEX('##', @string)
    WHILE @start < LEN(@string) + 1 BEGIN
        IF @end = 0
            SET @end = LEN(@string) + 2
        INSERT INTO @output (splitdata)
        VALUES(SUBSTRING(@string, @start, @end - @start))
        SET @start = @end + 2
        SET @end = CHARINDEX('##', @string, @start)
    END
    RETURN
END
CREATE FUNCTION [dbo].[SplitStringForDataRepeater2]
    ( @string NVARCHAR(MAX), @string2 NVARCHAR(MAX) )
RETURNS @output TABLE(splitdata NVARCHAR(MAX) , splitdata2 NVARCHAR(MAX))
BEGIN
    DECLARE @start INT, @end INT , @start2 INT, @end2 INT
    SELECT @start = 1, @end = CHARINDEX('##', @string) , @start2 = 1, @end2
=CHARINDEX('##', @string2)
    WHILE @start < LEN(@string) + 1 BEGIN
        IF @end = 0
        BEGIN
            SET @end = LEN(@string) + 2
            SET @end2 = LEN(@string2) + 2
        END
        INSERT INTO @output (splitdata, splitdata2)
        VALUES(SUBSTRING(@string, @start, @end - @start),SUBSTRING(@string2,
        @start2, @end2 - @start2))
        SET @start = @end + 2
        SET @end = CHARINDEX('##', @string, @start)
        SET @start2 = @end2 + 2
        SET @end2 = CHARINDEX('##', @string2, @start2)
    END
    RETURN END
HANA
CREATE FUNCTION SPLITSTRINGFORDATAREPEATER2 (strstring nvarchar(5000), strstring2 nvarchar(5000) )
RETURNS TABLE (splitdata nvarchar(5000) , splitdata2 nvarchar(5000) )
LANGUAGE SQLSCRIPT AS
BEGIN
    DECLARE strstart INT;
    DECLARE strend INT;
    DECLARE strstart2 INT;
    DECLARE strend2 INT;
    declare _items nvarchar(5000) ARRAY;
    declare _index integer;
    _index := 1;

    strstart := 1;
    strend := LOCATE(strstring, '##');
    strstart2 := 1;
    strend2 := LOCATE(strstring2, '##');

    WHILE strstart < LENGTH(strstring) + 1 DO
        IF strend = 0 THEN
            BEGIN
                strend := LENGTH(strstring) + 2;
                strend2 := LENGTH(strstring2) + 2;
            END;
        END IF;

        _items[:_index] := SUBSTRING(strstring, strstart, strend - strstart) || '|||' || SUBSTRING(strstring2, strstart2, strend2 - strstart2);

        _index := :_index + 1;

        strstart := strend + 2;
        strend := LOCATE(strstring, '##', strstart);
        strstart2 := strend2 + 2;
        strend2 := LOCATE(strstring2, '##', strstart2);

    end while;

    rst = UNNEST(:_items) AS ("items");

    RETURN
        SELECT SUBSTRING("items", 1, LOCATE("items", '|||') - 1) as "SPLITDATA", SUBSTRING("items", LOCATE("items", '|||') + 3, (LENGTH("items") - LOCATE("items", '|||') ) ) as "SPLITDATA2" FROM :rst;
 END;
Add a string
This customization will add a string to the Warehouse field on Sales Order Issue Lines screen.
Query name:
BXMobileWH9_SalesIssueLinesScreen_DataRepeater_InternalDataLoad
SQL
SELECT
    S.splitdata + ' Additional Info' AS [DataRepeater.UIWarehouse] from
    dbo.SplitStringForDataRepeater($[DataRepeater.UIWarehouse]) S
HANA
SELECT
    "S"."SPLITDATA" || ' Additional Info ' || AS "DataRepeater.UIWarehouse"
FROM
    SPLITSTRINGFORDATAREPEATER2(
       $[DataRepeater.UIWarehouse], '') AS "S"
Add information from RDR1
This customization will add information from RDR1 table by VisOrder.
Note: On some screens the sequence of VisOrder may start with 1 instead of 0 (in contrast with the SAP database table). In this case you can either reduce the splitter value with 1 or increase the VisOrder SAP field with 1 in the query.
We can load DocNumber from $[TextSalesOrder] field, and we can get the exact number with SUBSTRING. SplitStringForDataRepeater2 function splits UIWarehouse UILineNumber from the datarepeater, and then we can use them to connect to SAP table, and we can use the splitted values in the query.
Query name:
BXMobileWH9_SalesIssueLinesScreen_DataRepeater_InternalDataLoad
SQL
SELECT
    S.splitdata + ' - ' + ItemCode  AS [DataRepeater.UIWarehouse]      FROM
    dbo.SplitStringForDataRepeater2(         $[DataRepeater.UIWarehouse] ,
        $[DataRepeater.UILineNumber] ) S
    LEFT JOIN
    (SELECT
            '#'+ cast(VisOrder + 1 as varchar(10)) as ln,
            ItemCode
        FROM
            RDR1 left join ORDR on RDR1.DocEntry = ORDR.DocEntry
        WHERE
            ORDR.DocNum = SUBSTRING($[TextSalesOrder] ,0,CHARINDEX('*',
$[TextSalesOrder] )) )              as RDR1Line
    ON S.splitdata2 = RDR1Line.ln
HANA
SELECT
    "S"."SPLITDATA" || ' - ' || "ItemCode" AS "DataRepeater.UIWarehouse"
FROM
    SPLITSTRINGFORDATAREPEATER2(
       $[DataRepeater.UIWarehouse] ,
           $[DataRepeater.UILineNumber] ) AS "S"
    LEFT JOIN
    (SELECT
            '#' || cast("VisOrder" + 1 as varchar(10)) as "ln",
             "ItemCode"
        FROM
            "RDR1" left join "ORDR" on "RDR1"."DocEntry" = "ORDR"."DocEntry"
        WHERE
            "ORDR"."DocNum" = CAST( SUBSTRING($[TextSalesOrder] ,0, LOCATE($[TextSalesOrder], '*' ) - 2) AS int)) as "RDR1Line"
    ON "S"."SPLITDATA2" = "RDR1Line"."ln"
Adding extra lines to screens
This customization will add extra lines to the necessary screen beside the default lines.
Example
In this example we will add 3 extra lines to the Goods Receipts PO screen by running the necessary SAP user query. The extra lines are:
- Posting Date
- Document Date
- Ship to
1. We list the 3 extra lines in the Customization Fields window and fill in the necessary columns. In the Position Data column we also indicate that we wish to add 3 extra lines.

2. We run the necessary query.
Query name: BXMobileWH9_GoodsReceiptPOScreen_DataRepeater_InternalDataLoad
SQL
SELECT
 	REPLACE( S.splitdata , 'PO #', ''),
	'Posting Date ' + FORMAT( OPOR.DocDate, 'dd/MM/yyyy', 'en-US' ) as [DataRepeater.UICust01],
	'Document Date ' + FORMAT( OPOR.TaxDate, 'dd/MM/yyyy', 'en-US' ) as [DataRepeater.UICust02],
	'Ship to ' + OPOR.Address2 as [DataRepeater.UICust03]

from
     dbo.SplitStringForDataRepeater( $[DataRepeater.UIDocNum]  ) as S
	 LEFT JOIN OPOR on REPLACE( S.splitdata , 'PO #', '') = OPOR.DocNum
HANA
SELECT
 	REPLACE( "S"."SPLITDATA" , 'PO #', ''),
	'Posting Date ' || to_char( "OPOR"."DocDate", 'DD/MM/YYYY') as "DataRepeater.UICust01",
	'Document Date ' || to_char( "OPOR"."TaxDate", 'DD/MM/YYYY') as "DataRepeater.UICust02",
	'Ship to ' || "OPOR"."Address2" as "DataRepeater.UICust03"

from
     SPLITSTRINGFORDATAREPEATER2( $[DataRepeater.UIDocNum], '' ) as "S"
	 LEFT JOIN "OPOR" on REPLACE( "S"."SPLITDATA" , 'PO #', '') = "OPOR"."DocNum";
SAP user query:

3. After executing the query, the 3 extra lines will appear on the Goods Receipt PO screen as follows:

Custom printing
Custom Layout Printing
Report printing can be customized in Produmex Scan by using the customization technology described in: Customization Technology for Produmex Scan. A report can be printed with user queries in the following cases:
- The report is defined in SAP Business One, or
- The report is located in a folder Produmex Service Broker can access.
Import the report
Use the HanaReportSettingTool to configure the correct connection of the report file in HANA environment. You can read more about the tool in the UserGuide
Import the report in SAP Business One with the Report and Layout Import Wizard. Select ‘Inventory > Inventory Reports’ as the location.

To see the details of the report, open the Report and Layout Manager and select the report from the Inventory Reports. The report ID will identify the report in the user queries.

Examples
Example 1:
Add customization on the Done button event for the Create GR PO screen
Create the user Query in the Query Manager. The name of the user query must be the name of the Produmex Scan event.
Include the report ID and the report parameters in the user query.

Query name: BXMobileWH9_CreateGoodsReceiptPOQuantitiesNormalScreen_OK_clicked
Example query:
SQL
SELECT
   'RCRI0012'  "PrintLayout$",
   SUBSTRING ($[TextItem], 1 , CHARINDEX ('*', $[TextItem]) - 2 )  "Print_ItemCode",
   SUBSTRING ($[TextItem], CHARINDEX ('*', $[TextItem]) + 2, LEN ($[TextItem])- CHARINDEX ('*', $[TextItem]))   "Print_Item_ItemName",
   '' "Print_SerialNumber",
   '' "Print_BatchNumber",
   $[DataRepeater.SelectedUIOnHandQuantity] "Print_Quantity",
   'PDFCreator' "PrintPrinter$",
   'Document PRINTING'  "Message$", 'I' "MessageType$"
HANA
SELECT
   'RCRI0012'  "PrintLayout$",
   SUBSTRING ($[TextItem] , 1 , LOCATE ($[TextItem], '*') - 2 )  "Print_ItemCode",
   SUBSTRING ($[TextItem], LOCATE ($[TextItem], '*') + 2, LENGTH ($[TextItem])- LOCATE ($[TextItem], '*') ) "Print_Item_ItemName",
   '' "Print_SerialNumber",
   '' "Print_BatchNumber",
   $[DataRepeater.SelectedUIOnHandQuantity] "Print_Quantity",
   'PDFCreator' "PrintPrinter$",
   'Document PRINTING'  "Message$", 'I' "MessageType$"
   FROM DUMMY
The user query does the following:
Sets the parameters of the selected report to the values entered on the screen and sends it to the defined printer. Then displays the ‘Document printing’ message.
Report parameters in the example:
- Item code and name
- On hand quantity
- Batch number
- Serial number
Adjust the example query.
- Replace the PrintLayout$ value with the Report ID (in the example the report ID is RCRI0012).
- Replace the PrintPrinter$ value with your printer name (in the example the printer name is PDFCreator).
The label will be printed with the printer set in the user query regardless of the default printer of the employee.
By default only one label is printed. Adjust the value of the labels with the PrintCopies$ parameter.
The label is printed after the ‘Done’ button is pressed on the Create GR PO Quantities screen.

Example 2: Print label for the delivery selected on the Delivery field after the report ID is added on the Packing screen
Add a new custom ‘Label’ field. Insert the following record to the Customization Fields user table:
| Field Name | Labels | Screen |
|---|---|---|
| RPTCode | Label | PackingScreen |
Create two new user queries in the Query Manager.
The first query will trigger the printing if the Label field is not empty. Link this user query to the RPTCode field validation event.
After the report ID is added to the field, a confirmation message will pop up. Press the Yes button to print the label.
Query name: BXMobileWH9_PackingScreen_RPTCode_validate
IF $[RPTCode]<>'' AND $[TextDeliveryDocNum]<>''
SELECT
	'Print labels: ' + $[RPTCode] AS 'Message$',
	'YM' AS 'MessageType$'

The second query will define the printer and the report parameter values.
Link this user query to the validation_after event of the custom Label field. The query will run if the user presses the ‘Yes’ button on the confirmation message screen.
Query name: BXMobileWH9_PackingScreen_RPTCode_validate_after
IF $[RPTCode]<>'' AND $[TextDeliveryDocNum]<>''
SELECT $[RPTCode] AS PrintLayout$,
(SELECT DocEntry FROM ODLN WHERE DocNum=$[TextDeliveryDocNum]) AS [Print_DocKey@],
'PDFCreator' AS PrintPrinter$,
'Report print: '+ $[RPTCode] AS 'Message$', 'I' AS 'MessageType$'
Replace the PrintPrinter$ value with your printer name (in the example the printer name is PDFCreator).
Advanced printing configurations for Produmex Scan
With the advanced printing configurations printing issues caused by incorrect server/database connection settings in Crystal Reports can be solved.
To add the advanced printing configurations, run the following query on the database:
SQL
INSERT INTO "VALI002"."@BXPCONFIG" ("Code", "Name", "U_BXPDescr", "U_BXPValue", "U_BXPVType", "U_BXPRowVr")
VALUES('BXMPRAO', 'BXMPRAO', 'Crystal Reports connection parameters', '54', 1, NULL)
A new record will be inserted to the BXPCONFIG table. With this record the following parameters can be set:
- PRINTERADVANCEDOPTIONS_SETTABLELOGON = 1;
- PRINTERADVANCEDOPTIONS_SETTABLECONNECTION = 2;
- PRINTERADVANCEDOPTIONS_SETSUBREPORTS = 4;
- PRINTERADVANCEDOPTIONS_DISSOCIATESIZE = 8;
- PRINTERADVANCEDOPTIONS_USEPRINTERSETTINGS = 16;
- PRINTERADVANCEDOPTIONS_USECONNECTIONCLONE = 32;
- PRINTERADVANCEDOPTIONS_USESETTINGWITHNAME = 64;
The value of BXMPRAO is the sum of the value of the enabled parameters.
The default and recommended value is 54. It means that the Settable connection (2), the Set sub reports (4), the Use printer settings (16) and the Use connection clone (32) parameters are enabled (2+4+16+32=54) by default.
Do not change the default value. If the issue persists, please contact Produmex support.
Enabled settings:
- Settable connection (2): Creates a new connection structure with the actual parameters.
- Set sub reports (4): Applies the (1) and (2) setting to the sub reports as well.
- Use printer settings (16): Uses a non-standard access to printer settings.
- Use connection clone (32): Uses a clone of the connection structure.
Other settings that can be enabled:
- Settable log on (1): Resets the server/database connection to the actual in the tables of the existing structure. This setting is not taken into account if the Settable connection (2) setting is also enabled.
- Dissociate size (8): Enables the ‘Dissociate Formatting Page Size and Printer Paper Size’ option.
- Use setting with name (64): Uses both the standard and non-standard access to the printer settings.
Known cases:
* The error message 'Not supported within subreports'
Set the value to 1